
That little chip in your windshield seems harmless at first, right? Then, as you drive, you watch it slowly spread like a spiderweb. Suddenly, that tiny imperfection becomes a major eyesore—and a safety concern! Dealing with windshield damage is never fun, and the thought of a costly repair shop visit often makes things worse.
Choosing a Do It Yourself (DIY) repair kit adds another layer of confusion. Which kit actually works? Are they safe to use? You see so many brands, and the instructions can seem complicated. Nobody wants to waste money on a kit that leaves a cloudy mess behind. You need a solution that is fast, effective, and easy for anyone to handle.
This guide cuts through the clutter. We will show you exactly what to look for in a top-rated DIY windshield repair kit. You will learn the key features that guarantee a clear, strong fix every time. Stop worrying about that growing crack!
Ready to take control of your windshield maintenance? Let’s dive into how to pick the perfect kit and make that damage disappear for good.
Top Do It Yourself Windshield Repair Kit Recommendations

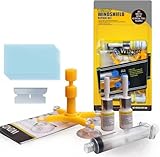
- Stops The Spread of Chips and Cracks - Rain-X Windshield Repair Kit Helps You Minimize The Appearance And Stop The Spread Of Chips And Cracks In Your Windshield.Fit Type: Universal Fit
- Easy To Use - Everything You Need Is Included, Takes Only Minutes With Minimal Steps. For Cracks Simply Apply Resin To Crack Then Curing Strips, Move Windshield Into Direct Sunlight And Remove Excess. Good for multiple repairs
- Durable Resin Formula - Use Durable Resin To Make Windshields Stronger Than Before, Repairing All Types Of Laminated Windshields Up To First Layer Of Windshield Glass
- For Best Results - Repairs Should Be Made As Soon As Possible After The Damage Occurs And Before The Break Has Had A Chance To Be Contaminated By Dirt Or Water
- Pro-Tip To Avoid Poor Results - Refrain From Applying Resin Too Quickly, Air Pockets Forming During The Repair Or Repairing On A Contaminated Crack As This May Compromise Your Results

- SAVE HUNDREDS ON WINDSHIELD REPLACEMENT: Make permanent, air-tight repairs on bullseye damage up to 1¼" in diameter on most laminated windshields , for a fraction of a dealer's cost.
- CRYSTAL-CLEAR REPAIR WITH ZERO GUESSWORK: Permatex's precision resin penetrates deep into the break, restoring strength and optical clarity. No cloudy, bubbly, or uneven results — just a clean, nearly invisible fix.
- SPRING-LOCK SYRINGE DOES THE HARD WORK FOR YOU: The advanced spring-lock mechanism controls pressure automatically, so resin flows exactly where it's needed. No mixing, no measuring, no experience required.
- JUST ADD SUNLIGHT, RESIN CURES NATURALLY: Skip the UV lamps and special equipment. Park in the sun for 15 minutes and let nature finish the job. Works on any day with natural daylight, even overcast skies.
- ONE BOX, ZERO EXTRA TRIPS: Every single item needed for a complete repair ships in the box: syringe, resin compound, adhesive disc, pedestal, curing strip, push pin, razor blade, prep towelette & photo instructions included.

- Professional-Grade Windshield Repair Kit with Powerful Vacuum Technology // Our advanced windshield repair kit features a new 20PA vacuum holder, designed to create an airtight seal that forces resin deep into the damage. This professional-grade design prevents air bubbles, ensuring a stronger, clearer, and more reliable repair for all types of windshield crack repair, from bullseyes to long-line cracks.
- Rapid, 5-10 Minute UV Cure – No Mixing Required // Experience a faster, simpler fix. This upgraded windshield chip repair kit includes a UV curing light with multiple timer and exposure settings. There's no mixing required; simply inject the resin and cure it in 5-10 minutes. This efficient process stops cracks from spreading instantly, saving you time and money on a full replacement.
- Versatile Solution for Chips, Cracks & Spiderwebs // This is the ultimate all-in-one glass repair kit. It effectively repairs a wide range of damage on laminated windshields, including star-shaped chips, half-moon cracks, spider webs, holes, and scratches up to 12 inches long. Make Cracks Gone with this versatile repair kit, your go-to solution for common windshield damage.
- Incredibly Strong & Durable Repair That Restores Integrity // Engineered for robust performance, our windshield crack repair resin boasts a remarkable shear strength. It creates a bond that restores the structural integrity of your glass, providing a lasting solution you can trust. This window crack repair kit delivers a near-invisible finish that holds strong even under pressure, keeping you safe on the road.
- User-Friendly Application for Professional Results at Home // Achieve expert-level results without the cost or hassle. This windshield repair kit for chips and cracks is designed for everyone. The process is straightforward: clean, inject, cover, and cure. With the included tools and clear instructions, anyone can use this repair kit to save hundreds of dollars on professional windshield replacement.

- Fast Repair: Fix chips and cracks in 5 minutes; Stop spreading; Save time and replacement costs
- All Damage Types: Treat bullseyes, stars, lines, radial cracks, and more; High-clarity resin makes repairs nearly invisible
- Strong Durability: Resist vibration, heat, cold, and daily wear; Advanced curing ensures a long-lasting bond
- Simple Process: Clean the glass, apply the resin, and cover with film; No removal needed; Results in minutes
- Multi-Surface: Use on windshields, side windows, sunroofs, mirrors, headlights, laminated glass, and industrial glass
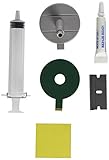
- PERFECT TOOL: Professional quality Do-It-Yourself windshield cracks/chips repairs with no mixing required, windshield repair kit can quickly and effectively repair small cracks chips only in 20-30 minutes. Save your time and money to prevents damage from spreading Restores windshield to near new condition. Long-lasting maintenance effect.
- WIDELY USE: Car Windshield Repair Kit is designed for most types of outer glass small damaged by double layer laminated windshield glass. The kit works best on small chips, bulls-eye, spider web, star-shaped, Half-moon crescents, crack not more than 12 inches/ 30 cm and round damage not more than one inch in diameter.
- EASY to OPERATE: The method of repairing slight glass cracks is to clean and dry the glass surface before construction and then squeeze the resin into the cracks of the cracks or bullets, then put on the curing strip, then quickly dry and solidify under ultraviolet light 5-10 mins. It is to scrape off the residual resin with a spatula.
- ADVANCED FORMULA: Imported repair fluid (this is the key), the shear strength can reach to 20PA, the repair location will not be broken even though glass break. Enhanced injection plastic injection molding head, can produce a strong pressure to push the repair liquid into cracks.
- HIGH QUALITY SERVICE: We have excellent customer service team which can help you solve your product issue after purchase. Please contact us directly if you have any question or dissatisfaction.
- 🔧 𝐂𝐎𝐌𝐏𝐋𝐄𝐓𝐄 𝐏𝐑𝐎𝐅𝐄𝐒𝐒𝐈𝐎𝐍𝐀𝐋 𝐊𝐈𝐓: The advanced glass scratch repair tool leverages cutting-edge technology to seep deep into glass cracks, creating a molecular bond that recovers more than 90% of the original strength and clarity. Unlike conventional adhesives, it overcomes inherent limitations by restructuring glass at a microscopic level, enabling rapid, versatile effective repairs for car windows, device screens, and similar surfaces.
- ⏱𝐈𝐍𝐃𝐔𝐒𝐓𝐑𝐘-𝐋𝐄𝐀𝐃𝐈𝐍𝐆 𝐄𝐅𝐅𝐈𝐂𝐈𝐄𝐍𝐂𝐘: You can achieve salon-standard remarkable repair results in less than 30 minutes with zero simple hassle: just inject the resin, cure it under UV light or natural sunlight (curing film is included in the kit), and finish with a quick polish. No drills, pumps, or messy tools are needed.
- 🔍 𝐑𝐄𝐏𝐀𝐈𝐑 𝐅𝐎𝐑 𝐕𝐄𝐑𝐒𝐀𝐓𝐈𝐋𝐄 𝐂𝐑𝐀𝐂𝐊 𝐓𝐘𝐏𝐄𝐒: Precision-engineered to specifically fix bullseye, star-shaped, spiderweb, and linear cracks, this repair fills micro-fractures with a UV-stable, waterproof, reliable resin. This specialized formula effectively stops cracks from spreading further, preserving the integrity of the glass surface.
- 🛡️ 𝐂𝐎𝐒𝐓-𝐄𝐅𝐅𝐄𝐂𝐓𝐈𝐕𝐄 𝐎𝐄𝐌 𝐀𝐋𝐓𝐄𝐑𝐍𝐀𝐓𝐈𝐕𝐄 (Practical & User-friendly): Each kit comes with two 3mL bottles of high-grade resin—enough for 4 to 6 repairs—helping you cut down up to 80% of the costs compared to dealership services. The package also includes curing films, application tools, and step-by-step user-friendly instructions for easy use.
- ✨𝐌𝐔𝐋𝐓𝐈-𝐒𝐔𝐑𝐅𝐀𝐂𝐄 𝐂𝐎𝐌𝐏𝐀𝐓𝐈𝐁𝐈𝐋𝐈𝐓𝐘 (Widely & Dependable): Rigorously lab-tested, this dependable repair liquid works flawlessly on laminated automotive windshields for chips & crack. Once cured, the repaired area can withstand extreme temperatures ranging from -40°F to 200°F.

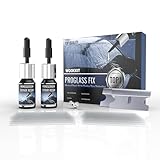
- 【Stop Cracks from Spreading – Permanently】One rock chip turns into a long crack overnight. Our nano liquid locks it instantly. No more spreading.
- 【Save $500 on Windshield Replacement】Dealerships charge a fortune. You pay 5% of that. Same result. No insurance hassle.
- 【 Invisible Repair – No Haze, No Bubbles】Cheap kits leave white spots. Ours dries crystal clear. You won't even find the damage afterward.
- 【 Done in 10 Minutes – No Tools, No Skills】Clean. Apply. Cover. Sun. That's it. No UV lamp. No confusion. No wasted time.
- 【2 Kits – Fix Now, Keep One for Later】That second crack always comes at the worst time. Be ready. Keep one in your glove box.
- Easy to use!
- Saves time and money!
- Cost Effective Repairs
- Stops crack from spreading
- Restores Windshield to Near New Condition
Your Guide to DIY Windshield Repair Kits: Fixing Chips and Cracks Like a Pro
A small chip or crack in your windshield can quickly turn into a big, expensive problem. Luckily, many DIY windshield repair kits can save you a trip to the auto shop. This guide helps you choose the right kit and understand how to use it effectively.
Key Features to Look For in a DIY Repair Kit
When shopping for a kit, certain features make the job easier and the repair stronger. Always check the packaging for these important elements:
- Resin Quality: The resin is the liquid glue that fills the damage. Look for high-quality, clear, and UV-curing resin. Good resin bonds strongly and resists yellowing over time.
- Applicator Type: Most kits use a syringe or a pedestal/bridge system. Syringes offer simple pressure application. Bridge systems often provide more controlled and even pressure, which is better for longer cracks.
- Complete Tool Set: A good kit includes everything you need. Check for razor blades for scraping, curing strips (small plastic films), and cleaning supplies. You do not want to start and realize you need another tool.
Important Materials Included in the Kit
The success of your repair depends on the quality of the included materials:
- The Resin: As mentioned, this is the most crucial part. Some advanced kits offer different viscosities (thicknesses) of resin for small chips versus thin cracks.
- The Injector/Applicator: This tool pushes the resin deep into the damaged area. It must create a strong vacuum or high pressure to force air out.
- Curing Strips: After applying the resin, you place a small plastic strip over the spot and expose it to sunlight. The sunlight hardens (cures) the resin into a permanent fix.
Factors That Improve or Reduce Repair Quality
Not all repairs turn out the same. Several factors affect how well your windshield looks and holds up after the repair.
Factors That Improve Quality:
- Cleanliness: You must clean the area perfectly before starting. Any dust, dirt, or moisture trapped inside the chip ruins the bond.
- Temperature: Most resins work best when the glass is warm, but not hot. Repairing in direct, scorching sunlight might cure the resin too fast on the surface, leaving air trapped underneath. Moderate warmth is ideal.
- Pressure Application: Applying steady, firm pressure with the injector pushes the resin into every tiny crevice of the damage.
Factors That Reduce Quality:
- Damage Size: Small chips (like a bullseye or star break smaller than a quarter) repair well. Long cracks (over 6 inches) or damage near the edge of the windshield usually require professional replacement. The kit simply cannot hold these large breaks together permanently.
- Old Damage: If the chip has been sitting for months, moisture and debris have deeply settled in. These older repairs often look cloudy even after treatment.
- Improper Curing: If you do not use enough sunlight or if you remove the curing strip too soon, the resin stays soft and weak.
User Experience and Use Cases
DIY kits offer a great user experience for minor issues. They are designed to be simple enough for beginners. You are essentially cleaning out the damaged glass, filling it with resin, and hardening it.
When to Use a Kit:
- You have a small chip (smaller than a dime) from a rock.
- You have a small star break with short legs radiating out.
- You want to stop a tiny crack from spreading until you can get a professional appointment.
The process usually takes about 30 to 45 minutes total. While the repair might not be 100% invisible, it restores the structural integrity of the glass and prevents the damage from spreading, which is the main goal.
10 Frequently Asked Questions (FAQ) About DIY Windshield Repair Kits
Q: Can this kit fix deep cracks?
A: Generally, no. These kits work best on surface chips and short cracks. Very deep cracks or those longer than 12 inches usually need professional replacement because the resin cannot fully strengthen the glass structure.
Q: Will the repair be completely invisible?
A: Rarely. A good repair will significantly reduce the visibility of the chip, making it much less noticeable. However, you will likely still see a slight shadow or imperfection where the damage was.
Q: How long does the repair last?
A: When done correctly with quality resin, the repair should last for years. The resin hardens permanently and protects the glass from moisture and further impact.
Q: What should I do if the resin doesn’t cure?
A: Make sure you used enough direct sunlight. If it remains gooey, carefully scrape off the soft resin with the razor blade and try the process again. Ensure the curing strip is placed tightly over the area.
Q: Can I use this kit in the rain?
A: Absolutely not. Water contamination is the number one killer of windshield repairs. Work in a dry area, like a garage, and ensure the windshield is completely dry before you start.
Q: Does this repair affect my insurance?
A: In many places, repairing a small chip does not affect your insurance. Some insurers even cover the cost of professional repair entirely because it prevents a full replacement claim later.
Q: Is the included razor blade safe?
A: The razor blade is sharp and is used to scrape away excess cured resin. Always use it carefully, holding it at a very shallow angle to the glass to avoid scratching the windshield surface.
Q: What if I mess up the first application?
A: Most kits allow you a second attempt. You can usually clean off the fresh, uncured resin with a paper towel and try injecting again. If the first attempt cured poorly, you must scrape it out before trying again.
Q: Do I need to remove the damaged glass pieces first?
A: You do not typically need to remove large pieces. The injector tool is designed to create pressure that pulls small, loose glass fragments into place and fills the void around them with resin.
Q: When should I call a professional instead of using the kit?
A: Call a professional if the damage is near the edge of the windshield (within 1-2 inches) or if the crack is longer than your hand span. These areas require specialized tools and heat to ensure safety.