
Do you dream of that warm, rich sound only a vacuum tube amplifier can produce? Many music lovers chase that perfect audio tone. However, finding the right ready-made tube amp can cost a lot of money. Building your own kit offers a fantastic alternative, letting you control the quality and save cash. But jumping into the DIY world brings its own worries. Which kit is best for a beginner? What tools do you really need? It’s easy to feel lost among all the specifications and parts.
This guide cuts through the confusion. We break down everything you need to know about choosing and assembling your very first DIY tube amplifier kit. You will learn how to spot quality components and avoid common beginner mistakes. By the end of this post, you will feel confident selecting the perfect kit to start your sonic journey. Get ready to build an amp that sounds amazing!
Top Diy Tube Amplifier Kit Recommendations

- 【Funtion】: This vacuum tube amplifier can connect the 6J1 tube pre-amp between sound source and amplifier, it will effectively filter digital flavor, the music and human voice will be relatively good.
- 【Eight 470uf Capacitor Filter】: Eight 470UF capacitor filter is very clean, excellent power system to no hum, filaments are powered with DC 12V and need to be connected in series in order to reduce noise.
- 【High Frequency And Low Proof】: The eight 470UF capacitors included in the DIY tube amplifier kit have very clean filtering, and the power system is excellent and noise-free. The filament is powered by DC 12V and needs to be connected in series to reduce noise.
- 【Assemble Yourself】: This diy amplifier kit comes in parts so you can assemble them together by yourself, enjoy the process of building your own tube amplifier.
- 【Easy To Use】: This vacuum tube amplifier uses a DC 5.5*2.1 socket and an AC 12V transformer. You can also use an AC 12V transformer. No plug is needed, just solder the power cord to the circuit board.
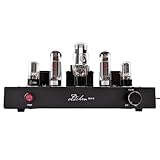
- AUTHENTIC SINGLE-ENDED CLASS A TUBE SOUND: Immerse yourself in the warm, rich, and incredibly detailed sound that only a Single-ended Class A amplifier can provide. Featuring a premium tube complement of EL34C power tubes, 5U4G rectifier, and 6SN7GT preamp tubes, this amplifier delivers lush, mellow vocals and transparent highs, making it perfect for jazz, classical, and acoustic music.
- MASTER-LEVEL HAND-WIRED CRAFTSMANSHIP: Built upon 20 years of expertise, each amplifier features meticulous hand-wired, point-to-point (PTP) circuitry. This traditional, time-honored technique minimizes signal path interference and maximizes sonic purity. The immaculate internal layout, utilizing Teflon silver-plated wiring, is a testament to our commitment to both performance and quality.
- PREMIUM AUDIOPHILE-GRADE COMPONENTS: No compromises were made in sourcing components. This amplifier is equipped with a custom-wound output transformer using imported Japanese Z11 silicon steel, a high-precision Japan ALPS potentiometer for smooth volume control, "Black Gold" series capacitors, and a robust CLC inductor filter (5 Henry) to ensure an ultra-clean power supply and silent background.
- POWERFUL & VERSATILE FOR YOUR SPEAKERS: With a robust 10W per channel output, this amplifier can effortlessly drive a wide range of bookshelf or floor-standing speakers with a sensitivity of 88dB or higher. The gold-plated pure copper speaker terminals provide solid connections for 4Ω and 8Ω speakers, accepting banana plugs, spade connectors, or bare wire.
- ROBUST POWER SUPPLY & CUSTOM TRANSFORMERS: The soul of the amplifier lies in its power. A heavy-duty CLC inductor filter (5 Henry) and our custom-wound transformers with Japanese Z11 steel create an ultra-clean power supply. This results in a virtually silent background with a noise floor of just 0.5-1mV, laying a solid foundation for its authoritative bass and expansive soundstage. At zero volume, any hum is negligible and only audible with an ear pressed to the speaker.

- DIY pedal kit - assembly and soldering required.
- 5W output power into 8 Ohm
- 1 channel
- Vintage channel controls: bass, treble and volume
- Vintage pilot lamp and screw-on jewel cover for power-on indication
- 【Eight 470uf Capacitor Filter】:Eight 470UF capacitor filter is very clean, excellent power system to no hum, filaments are powered with DC 12V and need to be connected in series in order to reduce noise.
- 【Funtion】:This vacuum tube amplifier can connect the 6J1 tube pre-amp between sound source and amplifier, it will effectively filter digital flavor, the music and human voice will be relatively good.
- 【High Frequency And Low Proof】:The eight 470UF capacitors included in the DIY tube amplifier kit have very clean filtering, and the power system is excellent and noise-free. The filament is powered by DC 12V and needs to be connected in series to reduce noise.
- 【Assemble Yourself】:This diy amplifier kit comes in parts so you can assemble them together by yourself, enjoy the process of building your own tube amplifier.
- 【Easy To Use】:This vacuum tube amplifier uses a DC 5.5*2.1 socket and an AC 12V transformer. You can also use an AC 12V transformer. No plug is needed, just solder the power cord to the circuit board.

- L12-2 Dual-Channel 120W+120W power amplifier kit
- Under the±50V. 8 ohm load to the power output of 120W.
- This is only a kit, you need to solder pieces together by yourself
- Per channel quiescent current is 80 MA works in CLASS AB.
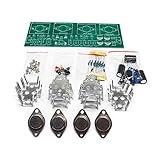
- Circuit Board Size: Glass Fiber Board 22.4cm*7cm, Working Voltage: Double AC 12V
- Fully Separated Components, Four High-power Triodes, Two Stereo Channels, Each Channel can Reach to 100W.
- The Power Amplifier Circuit of Household Power Amplifier and Active Speaker has a Good Effect.
- This Power Amplifier Uses a Typical OCL Circuit, Which Has the Advantages of High Stability, Wide Frequency Response Range, Good Fidelity, etc. This Circuit is Often Used in High-Fidelity Sound Reproduction Equipment.
- This OCL Stereo Amplifier is Suitable for the Assembly and Uuse of Electronic Enthusiasts and Audiophiles.

- NEW two-way 6E2 magic eye tube audio level indicator driver kit, suitable for DIY enthusiasts or installed in your gallbladder power amplifier, PCB board can be fixed in any cabinet amplifier, connecting the tube seat with flying wire. NOTE: This product can only give people a visual sensory experience, it is not a power amplifier. Tips: Shipped items as the first main picture shows, and the other pictures are only for reference.
- Two 6E2 tube magic eye drive board: audio signal that enables the 6E2's screen column to follow the size and flashing, the screen glow area is proportional to the signal size, when no signal, the luminous area is the most small, strong signal. The upper and lower light bands expand from both ends to the center until they overlap, excitation in the alterging signal.The 6E2's green electric-eye screen changes with the signal, lifelike like a cat's eye.
- The circuit of this drive board adds a first-stage amplification circuit to improve Input sensitivity, input device impedance of 100K, the board is equipped with 100K precision multi-turn adjustable resistance W1, W2, can adjust the input sensitivity, applicable a variety of signal options can be connected to the front-level audio signal output or the amplifier's horn output. W3, W4, which can adjust the screen opening amplitude,makes the left and right channels symmetrical at static time.
- This PCB board is a dual panel with a small form factor, reducing the required mounting space, easy to add to the existing equipment,installation use more flexible and convenient.Bile tube wire flying wire connection, so that the PCB board can be freely fixed position. PCB size: 76x42mm/2.99x1.65 inches; Fixed hole center distance: 64x34mm/2.52x1.34inch.
- The magic eye tube seat 1 foot (gate pole input), 2 foot (similar to anodes, 2, 6, 8 foot inside is connected can be connected feet.Tubes are different or slightly different), 3 foot (ground, cathode), 7 foot (similar to curtain gate adjustable light band open and close scale, 7, 9 at the bottom of the tube seat connected). 4,5 foot (filament), the 4 and 5 of two tubes can be connected freely, but it is necessary to distinguish between parallel(6.3v) or series(12.6v) wiring methods.

- Push-Pull Class AB Design: Experience high-efficiency amplification with the Juson Audio vacuum tube amplifier, utilizing a push-pull Class AB configuration for exceptional audio clarity, low distortion, and powerful dynamic range.
- Premium Vacuum Tube Configuration: Equipped with 4pcs EL34, 2pcs 4JD6, and 2pcs 4BE7 electron tubes, this integrated hifi amplifier delivers rich, warm sound for both front and back stage audio performance.
- Triode & Ultralinear Working Mode: Switch between triode mode for smooth, vintage tonality and ultralinear mode for tighter bass and higher power—customize your listening experience with ease.
- Dedicated Vacuum Tube Headphone Output: Enjoy pure tube-amplified personal listening through the built-in headphone output, delivering lush, detailed sound ideal for high-impedance headphones.
- 3-Way Line Level Input: Supports multiple audio sources via three independent line-level inputs, ensuring seamless integration with turntables(with amplification), streamers, CD players, and more in your hi-fi setup.
Your Guide to Choosing the Best DIY Tube Amplifier Kit
Building your own tube amplifier is a rewarding project. You get great sound and the pride of creating something yourself. This guide helps you pick the perfect kit.
Key Features to Look For
When you look at different kits, check these important parts first. These features decide how good your amp will sound and how easy it is to build.
- Circuit Design Type: Kits often use Single-Ended (SE) or Push-Pull designs. SE amps are simpler and offer a very warm, pure sound, often lower in power. Push-Pull amps give you more power and are generally louder.
- Tube Compatibility: Do you want classic tubes like 12AX7 or modern ones? Make sure the kit supports the tubes you like or the ones that are easy to find.
- Power Output (Watts): Low-power amps (2-5 watts) are great for quiet listening in a small room. Higher power amps (10+ watts) can drive bigger speakers better.
- Included Components: Does the kit come with high-quality capacitors and resistors? Better components usually mean better sound quality later on.
Important Materials That Matter
The materials used in the kit directly affect the amplifier’s performance and lifespan. Don’t overlook these physical parts.
- Transformers: These are the heart of the amp. Look for high-quality power and output transformers. Good transformers reduce hum and deliver clean power.
- Chassis: The metal box holding everything needs to be sturdy. A thick steel or aluminum chassis helps reduce vibrations, which can muddy the sound.
- Point-to-Point Wiring vs. PCB: Some kits use a Printed Circuit Board (PCB). Others require you to wire every component by hand (point-to-point). Point-to-point wiring is often preferred by purists for potentially better signal path quality, though PCBs can be easier for beginners.
Factors That Improve or Reduce Quality
Building the kit is only half the battle. The quality of the components used determines the final sound.
What Improves Quality:
Using high-quality components is key. Better capacitors (like film types instead of cheap electrolytic ones) allow the audio signal to pass through cleaner. Also, solid soldering technique is crucial. Poor solder joints cause crackling or failure later.
What Reduces Quality:
Cheap, generic transformers are a major quality killer. Also, poor grounding techniques during assembly introduce unwanted background noise, known as “hum.” If the instructions are unclear, mistakes often happen, lowering the final performance.
User Experience and Use Cases
Think about why you want this amp. This shapes the best kit choice for you.
- For Beginners: Choose a kit labeled “easy assembly” or one that uses a PCB. These kits usually include all necessary tools and have very clear, step-by-step instructions. You gain experience without getting frustrated.
- For Audiophiles: Look for kits that allow upgrades. These often feature better component layouts or use higher-end tubes from the start. These amps are usually meant for critical, quiet listening with sensitive speakers.
- Use Case: If you only listen at low volumes, a low-wattage Single-Ended amp sounds wonderful. If you plan to run larger floor-standing speakers, you need a Push-Pull design for enough volume.
Frequently Asked Questions (FAQ) About DIY Tube Amp Kits
Q: Do I need special tools to build a tube amp kit?
A: Yes, you need basic electronics tools. You must have a good soldering iron, solder, wire cutters, pliers, and a multimeter to check your work. Some kits include the basic tools.
Q: How long does it usually take to build a standard kit?
A: For a first-timer, expect to spend anywhere from 10 to 20 hours. Beginners should take their time to ensure every connection is correct. Experienced builders might finish in a single weekend.
Q: Are DIY tube amps safe for a beginner to build?
A: Tube amps use very high voltages, which can be dangerous even when unplugged because capacitors store energy. You must learn basic safety rules, like how to safely discharge capacitors before touching internal parts.
Q: What is “tube rolling”?
A: “Tube rolling” means swapping out the tubes in the sockets for different brands or types of the same base model. People do this because different tubes sound slightly different, letting you fine-tune the amplifier’s tone.
Q: Will a DIY kit sound better than a cheap modern amplifier?
A: Most often, yes. Tube amplifiers are famous for their warm, rich sound quality, often called “tube magic.” A well-built DIY kit usually outperforms mass-produced, inexpensive solid-state amps.
Q: What is the warranty like on these kits?
A: Warranties vary. Most companies warrant the parts against defects for 30 to 90 days. They usually do not cover damage caused by incorrect assembly or improper use.
Q: Do I have to buy the tubes separately?
A: Some kits are sold as “complete packages” and include the necessary tubes. Others are sold as “no tubes required” kits. Always check the product description carefully to see if the tubes are included in the price.
Q: How do I deal with background hum after building my amp?
A: Hum is usually caused by poor grounding. You must follow the wiring diagram exactly, especially where the ground wires connect. Sometimes, moving the input wires away from the power transformer helps reduce induced noise.
Q: Can I upgrade the components later if I start with a basic kit?
A: Absolutely! That is one of the best parts of DIY. You can easily swap out standard resistors or capacitors for higher-end versions later as your budget allows or your ears demand better sound.
Q: What kind of speakers work best with a low-power tube amp?
A: Low-power amps (under 5 watts) work best with high-efficiency speakers. Look for speakers rated 92dB/W or higher. These speakers need less power to play loudly and clearly.