
Can I hand polish a car to achieve a like-new shine? Yes, absolutely! With the right techniques and products, you can significantly improve your car’s paint finish through hand polishing, removing minor imperfections and bringing back its original luster. This guide will walk you through the process of car polishing by hand, turning your vehicle into a gleaming masterpiece.
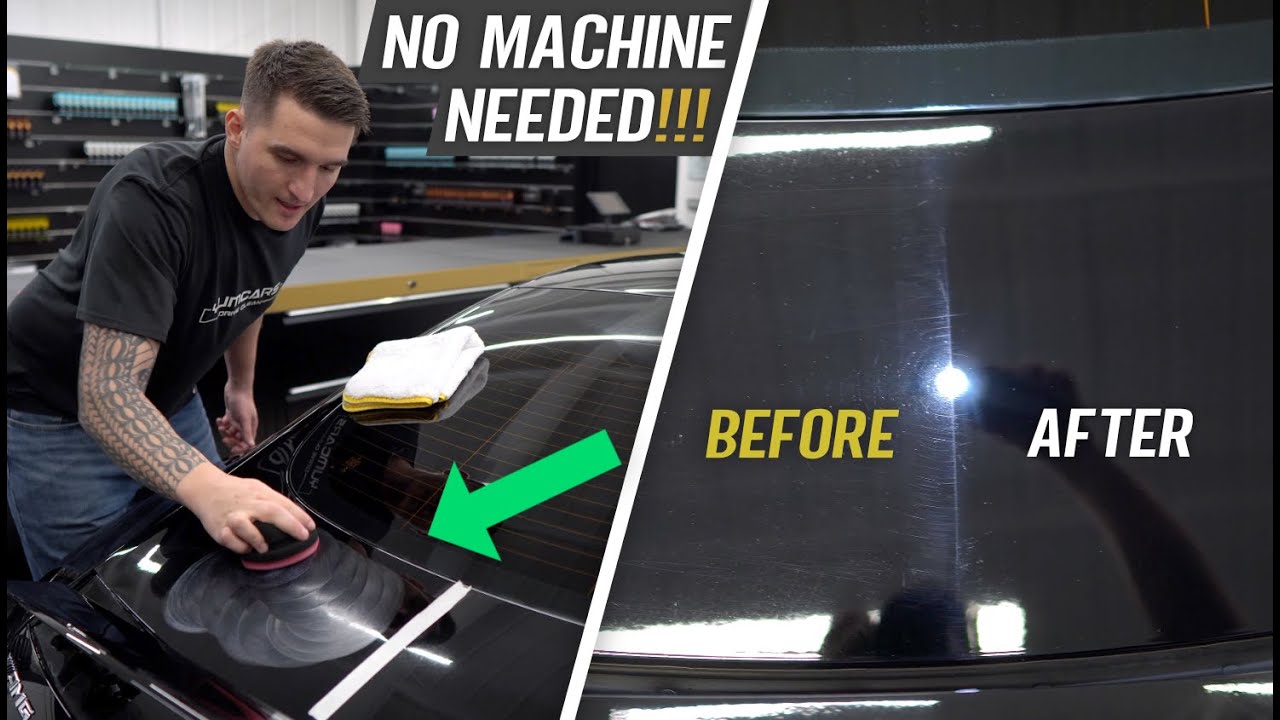
Image Source: i.ytimg.com
Deciphering the Art of Hand Polishing a Car
Hand polishing car surfaces is a rewarding process that rejuvenates your vehicle’s paintwork. It’s not just about making your car look good; it’s about protecting its value and enhancing its visual appeal. Unlike machine polishing, which uses power tools, hand polishing relies on your effort and the correct detailing products to achieve stunning results. This method is ideal for those who want to perform car detailing themselves, saving money while gaining satisfaction from a job well done.
Why Hand Polish Your Car?
There are several compelling reasons to consider hand polishing car surfaces:
- Restores Paint Clarity: Over time, your car’s paint can develop microscopic scratches, oxidation, and swirl marks from washing, drying, and environmental exposure. Polishing removes these imperfections, revealing the true color and shine of the paint.
- Removes Surface Imperfections: From light scratches and water spots to oxidation and stubborn contaminants, polishing can significantly reduce or eliminate them.
- Prepares for Waxing: A polished surface provides the perfect smooth canvas for car waxing. A layer of wax applied after polishing offers protection and enhances the depth of the shine.
- Enhances Resale Value: A well-maintained car with a gleaming finish is more attractive to potential buyers and commands a higher resale price.
- Satisfying DIY Project: The process of bringing your car’s paint back to life with your own hands is incredibly satisfying.
What You’ll Need: Essential Detailing Products
To embark on your car polishing journey, gather these crucial detailing products:
- Car Wash Soap and Buckets: For a thorough pre-wash.
- Wash Mitt and Drying Towels: High-quality microfiber is essential.
- Clay Bar or Clay Mitt: To remove bonded contaminants.
- Polishing Compound: Available in various grits for different levels of correction.
- Applicator Pads: Foam or microfiber pads specifically designed for polishing.
- Microfiber Towels: Plenty of clean, high-quality microfiber towels for wiping away residue.
- Car Wax or Sealant: For protection after polishing.
- Gloves: To protect your hands.
- Optional: IPA (Isopropyl Alcohol) solution for paint preparation.
The Step-by-Step Guide to Hand Polishing Your Car
Achieving a mirror-like finish is a multi-step process. Patience and attention to detail are key.
Step 1: The Crucial Pre-Wash and Decontamination
Before any polishing, the car must be impeccably clean.
Washing the Car
- Two-Bucket Method: Use one bucket for soapy water and another for rinsing your wash mitt. This prevents transferring dirt back onto the paint.
- Gentle Wash: Wash from the top down, rinsing your mitt frequently.
- Thorough Rinse: Ensure all soap residue is removed.
Decontaminating the Paint
Even after washing, microscopic contaminants cling to your paint.
- Clay Bar or Clay Mitt: These tools are designed to lift embedded grit, tar, and industrial fallout.
- How to Use a Clay Bar:
- Lubricate the surface generously with a clay lubricant spray or soapy water.
- Gently glide the clay bar over the surface in a back-and-forth motion.
- Fold the clay as it picks up dirt to expose a clean surface.
- Wipe the area with a clean microfiber towel.
- How to Use a Clay Mitt: Similar to a clay bar, but it’s a mitt that you use with a spray lubricant. It’s often faster and easier to use.
- How to Use a Clay Bar:
After claying, the paint surface should feel incredibly smooth, almost slick. Wipe it down with a clean microfiber towel.
Step 2: Inspecting and Preparing for Polishing
Now it’s time to examine the paint for defects and prepare the area.
Assessing Paint Condition
- Good Lighting: Work in a well-lit area, preferably in direct sunlight or under strong artificial lights, to clearly see swirl marks, scratches, and other imperfections.
- Identifying Issues: Look for dullness, oxidation (chalky appearance), scratches (white or colored lines), and especially swirl marks (fine, circular scratches often caused by improper washing techniques).
Protecting Trim and Plastic
- Masking: Use painter’s tape to mask off any rubber trim, plastic moldings, or sensitive areas. This prevents polishing compounds from staining or damaging them.
Step 3: Choosing Your Polishing Compound
Polishing compounds vary in their abrasiveness. Selecting the right one is vital for effective paint correction.
Grit Levels Explained
- Heavy Cut Compounds: For deep scratches and significant oxidation. Use with caution and follow up with a finer polish.
- Medium Cut Compounds: Effective for moderate swirl marks and light oxidation. This is often the go-to for most hand polishing car jobs.
- Fine Cut Compounds (Polishes): For removing light hazing and adding gloss after using a more aggressive compound.
- Finishing Polishes: Designed to add a final layer of shine and clarity without removing much paint.
Table: Choosing the Right Polishing Compound
| Paint Defect | Recommended Compound Type | Notes |
|---|---|---|
| Deep Scratches, Heavy Oxidation | Heavy Cut | Use sparingly, follow with finer compounds. |
| Moderate Swirl Marks, Light Haze | Medium Cut | Good balance of correction and finish. |
| Light Swirls, Minor Scratches | Fine Cut | Ideal for touch-ups and lighter correction. |
| Enhancing Gloss, Removing Haze | Finishing Polish | For the final step of polishing. |
For most hand polishing car projects aimed at restoring shine, a medium-cut polishing compound is often the best starting point.
Step 4: The Polishing Process: Elbow Grease and Technique
This is where the actual car polishing happens. The key is to work in small sections.
Applying the Polishing Compound
- Dispense Product: Apply a small amount of polishing compound to your applicator pad. Don’t overdo it; a little goes a long way.
- Work in Small Sections: Focus on an area about 2×2 feet at a time. This allows you to control the process and prevent the compound from drying out.
Polishing Technique
- Spread the Product: Gently spread the compound over the section you’re working on.
- Apply Pressure: Use moderate, consistent pressure. The pressure will depend on the aggressiveness of the compound.
- Crosshatch Pattern: Work the compound in a crosshatch pattern – first horizontally, then vertically. This helps ensure even coverage and effective defect removal.
- Slow, Deliberate Strokes: Use slow, overlapping strokes. Imagine you’re trying to evenly distribute the product across the entire section.
- Buffing Off: Once you’ve worked the product for a few passes, it will start to break down and become clearer.
- Wipe Away Residue: Use a clean microfiber towel to gently wipe away the residue. Inspect the section. If the imperfections are gone, move to the next section. If not, apply a little more compound and repeat the process.
- Important Note: If you are using multiple grades of polishing compound, start with the most aggressive and work your way down to the finest. For instance, if you use a medium-cut compound, follow up with a fine-cut polish on the same sections to refine the finish.
Dealing with Stubborn Marks
For very specific, deeper scratches, you might need to apply slightly more pressure or use a slightly coarser compound. Always test on an inconspicuous area first.
Step 5: Post-Polishing Cleaning and Inspection
After polishing all sections, it’s time for a final clean.
Removing Polish Residue
- Wipe Down: Use a fresh, clean microfiber towel to gently wipe down the entire car, removing any remaining polish residue.
- IPA Wipe (Optional but Recommended): For a truly clean surface, you can lightly mist the paint with an Isopropyl Alcohol (IPA) solution (typically 10-15% IPA mixed with distilled water). This removes any oils left by the polish and reveals the true condition of the paint, ensuring proper bonding for the wax. Wipe with a clean microfiber towel.
Inspecting Your Work
Take a moment to admire your hard work. The paint should look significantly clearer, smoother, and more reflective.
Step 6: Protecting Your Newly Polished Paint: Car Wax Application
Polishing removes imperfections but doesn’t protect the paint. Car waxing is the essential next step.
Choosing Your Wax
- Carnauba Wax: Offers a deep, warm glow and excellent depth.
- Synthetic Sealants: Provide longer-lasting protection and a sharper, more reflective shine.
- Hybrid Waxes: Combine the best of both worlds.
The Art of Car Wax Application
- Apply Sparingly: Apply a thin, even layer of wax to your applicator pad. Over-application leads to streaking and makes buffing difficult.
- Work in Sections: Just like polishing, work on one section at a time (e.g., a fender, a door).
- Gentle Application: Apply the wax using small, overlapping circular motions or straight-line motions.
- Allow to Haze: Let the wax dry to a haze. The time this takes depends on the product and environmental conditions (humidity, temperature). Usually, 5-15 minutes is sufficient.
- Buff to a Shine: Use a clean, soft microfiber towel to gently buff away the dried wax. Use light pressure and flip the towel frequently to a clean side.
Final Inspection After Waxing
Once waxed, your car’s paint should have a brilliant shine and a protective layer. The paint will feel incredibly smooth to the touch.
Common Issues and Solutions in Hand Polishing
Even with careful execution, you might encounter a few bumps along the road.
Dealing with Swirl Marks
Swirl marks are the bane of many car owners. Hand polishing car surfaces is effective in reducing their appearance, especially lighter ones. A medium-cut polishing compound is usually sufficient. If they are very deep, you may need to repeat the polishing process or consider a slightly more aggressive compound.
Preventing Paint Damage
- Cleanliness is Key: Always ensure your wash mitts, towels, and applicator pads are clean. Contaminated tools will create more scratches.
- Use Lubrication: Never use a clay bar or polish without proper lubrication.
- Don’t Over-Polish: Excessive polishing can thin the clear coat, so be mindful of how many passes you make.
What if the Polish Dries Too Quickly?
If the polishing compound starts drying on the paint before you can buff it off, it means you’re either working in direct sunlight, on a hot surface, or applying too much product. Work in the shade, on a cool surface, and use less product. You can also mist the area with a bit of water or clay lubricant to re-activate the polish.
Maintaining Your Polished Finish
The shine won’t last forever without proper upkeep.
Regular Washing
Continue using the two-bucket method and quality microfiber towels for washing. Avoid automatic car washes with harsh brushes, as they are notorious for creating swirl marks.
Periodic Re-Waxing
Reapply your chosen car wax or sealant every 1-3 months, depending on the product’s durability and environmental exposure. This maintains the protective layer and keeps the shine looking fresh.
Touch-Up Polishing
For minor new scratches or dull spots that appear between full polishing sessions, you can perform spot polishing with a fine-cut polish and a microfiber applicator pad.
Frequently Asked Questions (FAQ)
Q1: How often should I hand polish my car?
A: The frequency of hand polishing car surfaces depends on your car’s condition, exposure to the elements, and how often it’s washed. Generally, a full polish and wax every 6-12 months is sufficient for most vehicles. Minor touch-ups with a fine polish can be done more frequently.
Q2: Can I use household cleaners for polishing?
A: No. Household cleaners are often too abrasive or contain chemicals that can damage your car’s paint. Always use detailing products specifically designed for automotive paint.
Q3: What’s the difference between polishing and waxing?
A: Polishing is an abrasive process that removes minor defects and restores clarity to the paint. Waxing is a protective step that applies a layer of sealant or wax to protect the paint and enhance its shine. Polishing prepares the surface for waxing.
Q4: How long does hand polishing take?
A: A complete hand polishing car job can take anywhere from 4 to 10 hours, depending on the size of your vehicle, the condition of the paint, and your experience level. It’s a process best done with patience and without rushing.
Q5: Will hand polishing remove deep scratches?
A: Hand polishing is most effective for light to moderate scratches and swirl marks. Very deep scratches that you can feel with your fingernail may require machine polishing or professional paint correction services.
Q6: Can I use a t-shirt or old rag for polishing?
A: Absolutely not. Using old rags or t-shirts will likely create more scratches and swirl marks due to their abrasive nature and lack of proper weave. Always use clean, high-quality microfiber towels and applicator pads designed for automotive use.
By following these steps and using the right detailing products, you can achieve a stunning, like-new shine on your car through hand polishing. It’s a labor of love that pays off with a vehicle that truly turns heads.