
Can you remove scratches from a car dashboard? Yes, you can! This guide will show you how to easily and safely remove scratches from your car’s dashboard using simple methods and common household items. We’ll cover everything from minor scuffs to deeper gouges, ensuring your car’s interior looks its best.
Your car’s dashboard is a focal point of your interior. It’s the first thing you see when you get in, and it’s where you interact with most of your car’s controls. Over time, these surfaces can accumulate scratches from keys, fingernails, cleaning products, and general wear and tear. Thankfully, there are effective ways to tackle this problem. Whether you’re dealing with a faint haze or a noticeable line, this guide will help you restore your dashboard to its former glory. We’ll explore various techniques, from simple cleaning dashboard scratches to more involved car interior scratch repair.
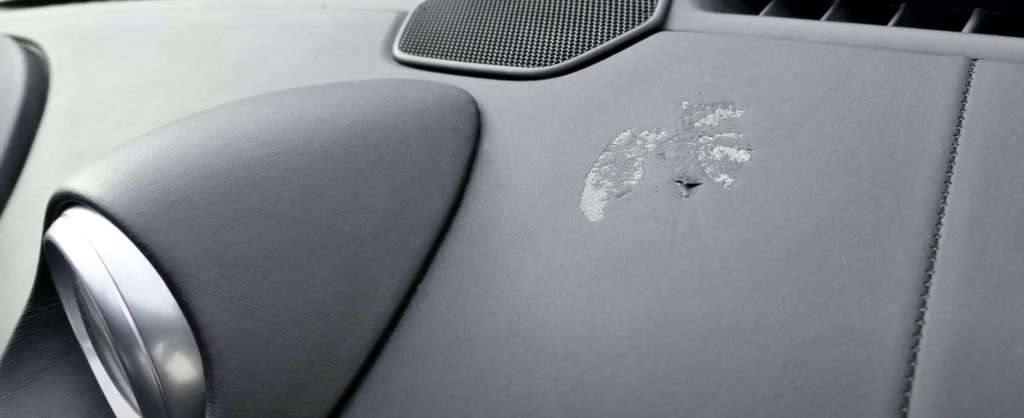
Image Source: avalonking.com
Deciphering Dashboard Materials: What Are You Working With?
Before you dive into scratch removal, it’s crucial to know what your dashboard is made of. Different materials require different approaches to avoid further damage. Most modern dashboards are made from a combination of plastics, vinyl, and sometimes even leatherette or painted surfaces.
Common Dashboard Materials:
- Hard Plastics: These are durable but can scratch easily. Common types include ABS (Acrylonitrile Butadiene Styrene) and polypropylene.
- Soft-Touch Plastics: These offer a more premium feel but can be more susceptible to surface scratches and scuffs.
- Vinyl: Often used for more flexible parts of the dashboard or trim pieces. Vinyl can be sensitive to harsh chemicals.
- Leatherette/Faux Leather: Some higher-end vehicles might have these materials on their dashboards. They require specific cleaning and conditioning.
Why Knowing Your Material Matters: Using the wrong product or technique on a specific plastic or vinyl can cause discoloration, dulling, or even melt the surface. Always try to identify the material of your dashboard for the best results. If you’re unsure, consult your car’s owner’s manual or look for manufacturer labels.
Safest First Steps: Initial Cleaning and Assessment
Before attempting any scratch removal, a thorough cleaning is essential. This removes dirt, dust, and debris that could cause further scratching during the repair process. It also allows you to clearly see the extent of the damage.
How to Clean Your Dashboard Safely:
-
Gather Your Supplies:
- Microfiber cloths (several)
- Mild car interior cleaner or a solution of mild soap and water
- Soft-bristle detailing brush
- Vacuum cleaner with a soft brush attachment
-
Dust and Vacuum:
- Start by lightly dusting the entire dashboard with a clean, dry microfiber cloth.
- Use the vacuum with the soft brush attachment to remove loose debris from crevices, vents, and around buttons.
-
Gentle Cleaning:
- Lightly mist a clean microfiber cloth with your interior cleaner or the soap-and-water solution. Never spray cleaner directly onto the dashboard, as it can drip into sensitive electronics.
- Gently wipe down the dashboard surfaces. For stubborn spots, use the soft-bristle brush to agitate the cleaner, then wipe away with the cloth.
- Use a separate, dry microfiber cloth to buff away any remaining moisture.
Important Note: Avoid using all-purpose cleaners, abrasive sponges, or harsh chemicals like ammonia or bleach. These can damage the dashboard material, cause fading, or leave a sticky residue.
Assessing the Scratches:
Once clean, take a good look at the scratches.
- Surface Scratches/Scuffs: These are light and typically only affect the clear coat or the very top layer of the plastic/vinyl. They often look like dull or hazy marks.
- Deeper Scratches: These are more visible and can feel like an indentation when you run your fingernail across them. They may penetrate deeper into the material.
The depth of the scratch will determine the best method for plastic dashboard scratch fix or vinyl dashboard scratch repair.
Techniques for Light Scratches and Scuffs
For minor scratches that haven’t penetrated the surface, gentle polishing and cleaning can often make them disappear. These methods focus on lightly abrading the surface to level out the scratch or filling it in to make it less visible.
Method 1: The Microfiber Polish
This is the gentlest approach and often works for very light surface marring.
What You’ll Need:
- Clean, soft microfiber cloths
- A high-quality automotive interior plastic or vinyl polish/cleaner
Steps:
- Ensure the dashboard is clean and dry.
- Apply a small amount of the interior polish or cleaner to a clean microfiber cloth.
- Gently rub the polish onto the scratched area using small, circular motions.
- Apply light to moderate pressure. The goal is to gently buff the area.
- Continue polishing for a minute or two, checking your progress frequently.
- Use a separate, clean microfiber cloth to wipe away any excess polish.
- Observe the area. If the scratch is less visible or gone, you’re done. You can repeat this process a couple of times if needed.
This method is excellent for how to polish car dashboard scratches when they are only on the surface. It’s essentially a mild form of buffing out dashboard scratches.
Method 2: Specialized Interior Cleaners/Conditioners
Some automotive interior cleaners and conditioners are designed to fill in very fine scratches and restore the finish.
What You’ll Need:
- Specific automotive interior cleaner/conditioner product designed for plastics and vinyl.
- Microfiber applicator pads or cloths.
Steps:
- Clean the dashboard thoroughly as described earlier.
- Apply a small amount of the product to an applicator pad.
- Gently work the product into the scratched area using overlapping motions.
- Allow the product to sit for the time recommended on the packaging (usually a minute or two).
- Buff off any excess with a clean microfiber cloth.
- The product often contains light fillers that can make minor imperfections less noticeable.
This is a good first step for tackling dashboard scratch removal kit components or when you want to add a protective layer.
Method 3: The Baking Soda Paste (Use with Extreme Caution)
Baking soda is a mild abrasive. While it can work for very light scratches on some plastics, it carries a risk of creating more fine scratches if not used carefully. This is a common DIY car dashboard scratch repair technique but requires diligence.
What You’ll Need:
- Baking soda
- Water
- Small bowl
- Soft microfiber cloths
Steps:
- Clean the dashboard thoroughly.
- In the small bowl, mix baking soda with a little water to create a thick paste. It should have the consistency of toothpaste.
- Apply a small amount of the paste to a clean microfiber cloth or a cotton swab.
- Gently rub the paste onto the scratch using very light pressure and small, circular motions.
- Work on the scratch for no more than 10-15 seconds at a time.
- Wipe away the paste with a damp microfiber cloth, then immediately dry the area with a clean, dry cloth.
- Inspect the scratch. If it’s less visible, you can repeat the process very carefully. If you see any new hazing, stop immediately.
Warning: This method can dull the finish if overused or if the pressure is too high. It’s best reserved for areas that are not highly visible if you’re unsure.
Tackling Moderate Scratches: Filling and Restoration
When scratches are deeper and more visible, filling or more advanced polishing techniques might be necessary. These methods aim to fill the void of the scratch or abrade the surrounding material to a level that matches the scratch depth.
Method 4: Toothpaste (Non-Gel, Whitening)
Similar to baking soda, certain toothpastes contain mild abrasives that can help buff out light scratches.
What You’ll Need:
- White, non-gel toothpaste (avoid colored or heavily abrasive types)
- Water
- Soft microfiber cloths
- Cotton swabs (optional)
Steps:
- Clean and dry the dashboard area.
- Apply a small dab of non-gel toothpaste onto a damp microfiber cloth or a cotton swab.
- Gently rub the toothpaste into the scratch using light pressure and circular motions.
- Work the area for about 10-20 seconds.
- Wipe away the toothpaste residue with a clean, damp microfiber cloth.
- Dry the area with a separate, clean microfiber cloth.
- Repeat if necessary, but be cautious as excessive rubbing can still damage the finish.
This is another popular DIY car dashboard scratch repair method that focuses on mild abrasion.
Method 5: Heat Gun or Hair Dryer (Advanced Technique – Use Extreme Caution)
Applying controlled heat can sometimes help “re-flow” or soften certain plastics, making minor scratches less apparent. This is an advanced technique and carries a significant risk of melting or warping the dashboard if not done correctly.
What You’ll Need:
- A heat gun with adjustable temperature settings or a powerful hair dryer
- A clean microfiber cloth
- A heat-resistant glove (recommended)
Steps:
- Ensure the dashboard is clean and dry.
- Set your heat gun to its lowest setting or use a hair dryer on a medium-low heat setting. Keep it at least 6-8 inches away from the surface.
- Move the heat source constantly in a sweeping motion over the scratched area. Never concentrate heat on one spot for too long.
- As you heat the plastic, you might see the scratch become less visible as the material softens and reforms.
- Once the scratch appears to have disappeared or significantly diminished, immediately move the heat away and let the area cool completely.
- Once cool, wipe the area with a clean microfiber cloth.
Warning: This method is risky. Overheating can cause irreversible damage, melting, discoloration, or bubbling of the plastic. Practice on an inconspicuous area first if possible. This is not recommended for beginners or for delicate dashboard materials.
Method 6: Dashboard Scratch Filler Products
For deeper scratches where the material is actually missing, a filler product can be the solution. These products are designed to fill the void and then be colored or smoothed to match the surrounding surface.
What You’ll Need:
- A dedicated automotive interior plastic/vinyl scratch filler kit
- Fine-grit sandpaper (e.g., 2000-3000 grit, used wet)
- Rubbing alcohol (for cleaning)
- Microfiber cloths
- Applicator tool (often included in the kit)
Steps:
- Clean the scratched area thoroughly with rubbing alcohol and a microfiber cloth to remove any oils or residues.
- Carefully apply the scratch filler according to the product’s instructions. Usually, you’ll use the applicator to press the filler into the scratch.
- Allow the filler to cure completely. This can take anywhere from a few minutes to several hours, depending on the product.
- Once cured, if the filler is slightly raised, you may need to very gently wet-sand the area with extremely fine grit sandpaper (like 2000-3000 grit) to level it with the surrounding surface. Keep the sandpaper wet and use minimal pressure.
- After sanding, clean the area again.
- If the filler is not colored to match, you might need a plastic repair pen or a coloring compound to blend the repaired area.
- Finally, apply a plastic protectant or conditioner to give it a uniform look.
A good dashboard scratch filler can be very effective for more significant damage.
Advanced Techniques & Professional Options
If DIY methods don’t yield the desired results or if the dashboard is made of a particularly sensitive material, consider these options.
Method 7: Using a Dedicated Dashboard Scratch Removal Kit
Many reputable automotive brands offer specialized dashboard scratch removal kits. These kits typically contain a range of products designed for different types of damage and materials.
Typical Kit Components:
- Various polishes and compounds
- Plastic cleaners and protectants
- Applicator pads and microfiber cloths
- Sometimes, a mild abrasive compound for deeper scratches
How to Use:
- Always follow the specific instructions provided with the kit.
- Start with the least aggressive product and method first.
- Test on an inconspicuous area if possible.
- These kits are a good investment for serious detailers or those with multiple vehicles.
Method 8: Professional Detailing Services
For very deep scratches, significant damage, or if you’re uncomfortable performing the repairs yourself, professional car detailing services are an excellent option.
What They Offer:
- Expertise in identifying dashboard materials and damage.
- Access to specialized tools and professional-grade products.
- Techniques like plastic welding for deeper gouges or specialized re-texturing.
Benefits:
- Guaranteed results (often).
- Saves you time and potential frustration.
- Can restore the dashboard to near-new condition.
Preventing Future Scratches
Prevention is always better than cure. By adopting a few good habits, you can keep your car’s dashboard looking pristine.
Smart Habits for Dashboard Care:
- Clean Regularly: Dust and dirt are abrasive. Frequent, gentle cleaning prevents them from becoming embedded and causing scratches.
- Use Proper Cleaning Tools: Always use soft microfiber cloths and automotive-specific interior cleaners.
- Avoid Harsh Chemicals: Steer clear of household cleaners, solvents, or abrasive pads.
- Be Mindful of Items Placed on the Dash: Avoid placing keys, wallets, or rough items directly on the dashboard. Use a dashboard mat or tray if needed.
- Protect from Sun Exposure: Prolonged UV exposure can degrade plastics and make them more prone to scratching and fading. Use a sunshade when parked.
- Apply a Dashboard Protectant: Many interior protectants offer UV protection and a conditioning layer that can help prevent minor scuffs.
Summary Table: Scratch Repair Methods
| Scratch Type | Recommended Method(s) | Key Products/Tools | Caution Level |
|---|---|---|---|
| Very Light Scuffs | Microfiber Polish, Interior Cleaner/Conditioner | Microfiber cloths, automotive interior polish/cleaner | Low |
| Light Scratches | Interior Cleaner/Conditioner, Toothpaste (carefully) | Microfiber cloths, automotive interior cleaner/conditioner, white toothpaste | Low to Medium |
| Moderate Scratches | Baking Soda Paste (very carefully), Scratch Filler | Baking soda, water, microfiber cloths, dedicated scratch filler kit | Medium to High |
| Deeper Scratches | Scratch Filler, Professional Detailing | Dedicated scratch filler kit, fine-grit sandpaper (wet), professional services | High |
| Surface Haze | Microfiber Polish | Microfiber cloths, automotive interior polish | Low |
Frequently Asked Questions (FAQ)
Q1: Can I use car wax on my dashboard?
A1: Generally, no. Car wax is formulated for exterior paint and can leave a greasy residue or attract dust on interior surfaces, potentially dulling the finish. Stick to automotive interior-specific products.
Q2: My dashboard has a white, hazy scratch. What caused it and how can I fix it?
A2: White haziness often indicates a light surface scratch or damage to the protective coating on the plastic or vinyl. This can usually be addressed with a good quality interior plastic polish and a clean microfiber cloth, using gentle circular motions. The polishing action can help smooth out the surface and make the haze disappear.
Q3: Is it safe to use rubbing alcohol to clean my dashboard?
A3: Rubbing alcohol (isopropyl alcohol) can be used very sparingly and diluted with water for stubborn spots. However, pure or frequent use of rubbing alcohol can dry out and damage certain plastics and vinyl, leading to cracking or discoloration. Always test in an inconspicuous area first and use a dedicated interior cleaner when possible.
Q4: What is the best product for vinyl dashboard scratch repair?
A4: For vinyl, look for products specifically labeled for vinyl interior care. These often contain conditioners that can help smooth minor imperfections. For deeper scratches, a vinyl-specific filler or a professional repair kit might be necessary.
Q5: How can I prevent scratches on my new car’s dashboard?
A5: Clean your dashboard regularly with soft microfiber cloths. Avoid placing sharp objects on it. Use a dashboard mat or tray for items like keys or sunglasses. Apply a good quality interior protectant that offers UV protection, as this can help keep the material supple and less prone to damage.
By following these guidelines, you can effectively address scratches on your car’s dashboard and maintain a clean, appealing interior. Remember to always start with the gentlest method and work your way up, prioritizing the safety and longevity of your dashboard material.