
Can you hand buff a car to achieve a showroom finish? Yes, with the right approach and a bit of patience, you can hand buff your car to a remarkable, mirror-like shine, achieving results that rival professional detailing.
Getting that pristine, “just rolled off the showroom floor” look for your car doesn’t always require expensive machines or professional help. Hand buffing is a rewarding process that allows you to connect with your vehicle and bring out its natural beauty. It’s a form of car polishing that, when done correctly, can dramatically improve your car’s paintwork, removing imperfections and revealing a deep, glossy finish. This in-depth guide will walk you through the essential steps, tools, and techniques needed for effective automotive detailing through hand buffing.
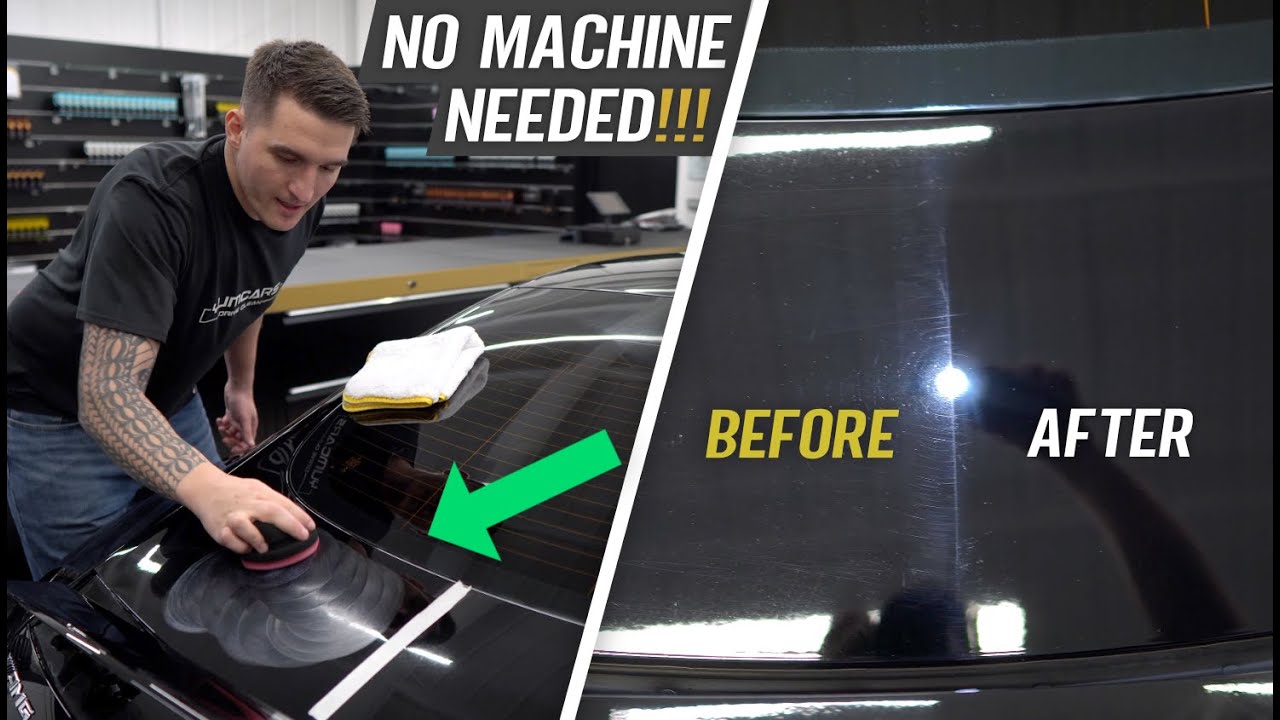
Image Source: i.ytimg.com
Why Hand Buff Your Car?
Hand buffing offers several advantages, especially for car owners who prefer a more hands-on approach or for those with classic cars or delicate paint finishes.
- Control: You have complete control over the pressure and movement, reducing the risk of damaging the paint.
- Accessibility: It doesn’t require costly polishing machines. All you need are quality products and a bit of elbow grease.
- Cost-Effective: Compared to professional paint correction services, hand buffing is significantly cheaper.
- Therapeutic: For many car enthusiasts, the process of meticulously caring for their vehicle is a relaxing and satisfying hobby.
- Detailing Finesse: It allows for precision work in tight areas or on specific imperfections that machines might miss.
Gathering Your Supplies: The Right Tools for the Job
Before you start, ensure you have all the necessary materials. Using high-quality products is crucial for achieving the best results and protecting your car’s paint.
Essential Materials:
- High-Quality Car Wash Soap: Start with a pH-neutral soap to clean the car thoroughly without stripping existing wax or sealant.
- Wash Mitts: Use separate wash mitts for the top and bottom halves of the car to prevent cross-contamination of dirt. Microfiber mitts are ideal.
- Drying Towels: Plush microfiber drying towels are essential for safely drying the car without scratching the paint.
- Clay Bar Kit: This kit usually includes a clay bar and a lubricant spray. It’s vital for removing bonded contaminants from the paint surface.
- Car Polish (Polishing Compound): This is the core product for hand polishing techniques. Polishes are mildly abrasive and designed to remove light imperfections. They come in various grades (fine, medium, heavy). For hand buffing, a fine or medium-cut polish is generally best.
- Applicator Pads: Foam or microfiber applicator pads are used to apply the polishing compound. Choose ones specifically designed for paint polishing.
- Microfiber Towels (Buffing/Wiping Towels): You’ll need several clean, high-quality microfiber towels to wipe away polish residue and buff the paint to a shine.
- Car Wax or Sealant: After polishing, applying a wax or sealant protects the paint and enhances its gloss.
- Gloves: Protect your hands from the chemicals in the polishing compounds and protect the paint from oils on your skin.
Optional, But Recommended:
- Degreaser/All-Purpose Cleaner (APC): For cleaning stubborn grime, especially on lower panels.
- Wheel Cleaner: For cleaning wheels separately.
- Detailing Brushes: For cleaning emblems, grilles, and tight crevices.
- Masking Tape: To protect trim and plastic parts from the polishing compound.
- Work Light: A good portable work light can help you spot imperfections more clearly.
Preparing Your Car: The Foundation for a Flawless Finish
A clean surface is paramount before you even think about applying polish. Any dirt or debris left on the paint can cause scratches during the buffing process.
Step 1: Thorough Washing
- Choose Your Location: Park your car in a shaded area. Direct sunlight can cause washing and polishing products to dry too quickly, leaving streaks.
- Pre-Rinse: Rinse the entire car with water to remove loose dirt and debris.
- Two-Bucket Method:
- Fill one bucket with car wash soap and water.
- Fill the second bucket with plain rinse water.
- Dip your wash mitt into the soap bucket. Wash a section of the car, starting from the top and working your way down.
- Rinse the mitt thoroughly in the plain water bucket before returning it to the soap bucket. This prevents grit from being transferred back onto the paint.
- Rinse Thoroughly: Once washed, rinse the car completely with clean water.
Step 2: Decontamination with a Clay Bar
This step is critical for paint correction and achieving a smooth surface for polishing.
- Lubrication is Key: Spray the clay lubricant generously onto a small section of the paint (about 2×2 feet).
- Clay the Surface: Gently glide the clay bar over the lubricated surface in a back-and-forth motion. You should feel some resistance as the clay lifts contaminants.
- Inspect and Fold: As the clay picks up dirt, it will become dirty. Fold the clay to expose a clean surface, or use a fresh piece. If you drop the clay bar, discard it immediately as it will pick up grit and scratch your paint.
- Wipe Clean: After claying a section, wipe it dry with a clean microfiber towel.
- Repeat: Continue this process over the entire car, including windows (if using a clay designed for glass).
Step 3: Drying
- Gentle Drying: Use plush microfiber drying towels to gently pat or blot the water off the car. Avoid rubbing, which can cause micro-scratches.
- Door Jambs and Seals: Don’t forget to dry door jambs, trunk openings, and around seals.
Step 4: Inspecting the Paint
With the car clean and dry, take a good look at the paint. Use a good light source (like a work light or even the sun at an angle) to identify:
- Swirl Marks: Fine, circular scratches often caused by improper washing or drying.
- Scratches: Deeper than swirl marks.
- Oxidation: Dull, faded areas of paint.
- Water Spots: Mineral deposits left behind after water dries.
These are the imperfections your hand buffing will aim to address.
The Hand Buffing Process: Bringing Out the Shine
Hand buffing is essentially car polishing done by hand. It involves using a polishing compound with an applicator pad to remove minor paint defects and enhance gloss.
Choosing Your Polishing Compound
Polishing compounds vary in their abrasiveness. For hand buffing, you typically want to start with the least aggressive compound that will effectively remove the defects you’ve identified.
- All-In-One (AIO) Polish: These often contain mild abrasives, fillers, and sometimes even a sealant or wax. They are good for quick enhancements.
- Swirl Remover/Fine Polish: Designed to remove light swirl marks and hazing, leaving a high-gloss finish.
- Medium Cut Polish: For slightly deeper scratches and more significant oxidation. Use with caution if you’re new to polishing.
- Heavy Cut Compound: Generally too aggressive for hand buffing and best left for machine use.
For most enthusiasts looking for a showroom finish through hand buffing, a swirl removal polish or a fine-cut polish is the ideal choice.
Step-by-Step Hand Buffing
-
Masking (Optional but Recommended): Use masking tape to protect any rubber trim, plastic, or delicate areas that you don’t want to polish. Polish can stain or haze these materials.
-
Applying the Polish:
- Apply a small amount of polishing compound (about a quarter-sized dollop) to your foam or microfiber applicator pad. You don’t need a lot.
- Gently spread the polish over a small section of the paint, roughly 2×2 feet.
-
The Buffing Motion: This is where the hand polishing techniques come into play.
- Pressure: Apply moderate, consistent pressure. Think of it as a firm, but not aggressive, rub.
- Pattern: Work in a criss-cross pattern (horizontal strokes followed by vertical strokes) or in straight-line motions. This helps ensure even coverage and effective swirl removal. Avoid circular motions, as these can induce new swirl marks, especially if you’re not experienced.
- Speed: Work at a steady, consistent pace. Don’t rush. The friction generated by your hand and the polish does the work.
-
Working the Polish:
- Continue working the polish into the paint until it starts to become clear or hazy. This indicates the abrasives have broken down and done their job.
- You might need to apply a little more pressure as the polish becomes clear.
-
Wiping Off Residue:
- Use a clean, plush microfiber towel to gently wipe away the polish residue.
- Use a separate, clean section of the towel for each wipe. Flip the towel frequently.
-
Inspection and Repeat:
- Inspect the section you just worked on under good lighting.
- If the imperfections are gone and the paint looks smooth and glossy, move to the next section.
- If imperfections remain, you may need to apply another layer of polish, perhaps with slightly more pressure, or consider a slightly more aggressive polish if the current one isn’t making enough impact. However, be very careful with pressure and product choice to avoid over-abrasion.
-
Panel by Panel: Work your way around the entire car, section by section, repeating the application, buffing, and wiping process. Pay attention to areas with visible defects like scratch repair.
Table: Common Paint Imperfections and Hand Buffing Solutions
| Imperfection | Cause | Hand Buffing Approach |
|---|---|---|
| Swirl Marks | Improper washing/drying, automatic car washes | Use a fine-cut or swirl remover polish with a foam applicator pad. Apply moderate pressure in a controlled pattern. |
| Light Scratches | Key scratches, fingernails, light abrasions | A medium-cut polish might be needed. If the scratch is deep enough to catch your fingernail, hand buffing may not fully remove it, but it can minimize its appearance. Focus on carefully working the polish. |
| Holograms/Buffer Trails | Aggressive polishing or improper wipe-off | Use a less aggressive polish and a softer applicator pad. Ensure thorough wipe-off with clean microfiber towels. Good technique is key. |
| Oxidation (Light) | UV rays, environmental exposure | A dedicated polish designed for oxidation or a medium-cut polish can help restore gloss by removing the dull top layer of clear coat. |
| Water Spots | Hard water residue left to dry on the paint | Often removed with a good polish. If etched into the clear coat, a polish can minimize the appearance by smoothing the surface. |
Protecting Your Work: Wax Application and Beyond
Once you’ve finished polishing and your car’s paint looks fantastic, it’s crucial to protect that hard work. Applying a wax or sealant is the final step in achieving that deep, lasting shine.
Step 1: Applying Wax or Sealant
-
Choose Your Protection:
- Car Wax: Typically derived from carnauba, it provides a warm, deep glow and good protection. Needs to be reapplied more frequently (every 1-3 months).
- Paint Sealant: Synthetic polymer-based protection. Offers excellent durability and a slick, reflective shine. Can last 4-6 months or longer.
-
Application Method:
- Apply a thin, even layer of wax or sealant using a clean foam or microfiber applicator pad.
- Work in small sections, using a back-and-forth or overlapping circular motion. A little goes a long way.
-
Curing Time: Allow the wax or sealant to haze over according to the product’s instructions. This usually takes 5-20 minutes.
-
Buffing Off:
- Using a clean, soft microfiber towel, gently buff off the hazy residue.
- Use a buffing motion. Flip the towel frequently to a clean side to achieve a brilliant shine.
Step 2: Detailing the Finishing Touches
- Windows: Clean all glass surfaces with a dedicated glass cleaner and a separate microfiber towel.
- Tires: Apply a tire dressing for a deep black, finished look.
- Trim: Use a trim restorer on black plastic or rubber trim if needed.
- Final Inspection: Step back and admire your work! Use your work light again to catch any missed spots or streaks.
Maintaining Your Showroom Finish
Achieving a showroom finish is only half the battle. Proper maintenance will keep your car looking its best for longer.
- Regular Washing: Wash your car regularly using the two-bucket method and quality car wash soap.
- Proper Drying: Always dry with microfiber towels, avoiding air drying that can leave water spots.
- Quick Detailing: Use a quick detailer spray and microfiber towel to remove light dust or fingerprints between washes.
- Avoid Harsh Cleaners: Steer clear of dish soap or household cleaners, which can strip protection.
- Clay Bar Periodically: Depending on your driving environment, you might need to clay bar your car every 6-12 months to remove new contaminants.
- Reapply Protection: Reapply wax or sealant as needed based on its durability and your car’s exposure to the elements.
Frequently Asked Questions About Hand Buffing
Q1: How often should I hand buff my car?
You don’t need to hand buff your car with polishing compound every time you wash it. Polishing removes a microscopic layer of clear coat. Hand buffing for light defect removal or gloss enhancement can be done every 6-12 months, or as needed when you notice dullness or minor imperfections. Regular washing and waxing/sealing are more frequent maintenance tasks.
Q2: Can hand buffing remove deep scratches?
Hand buffing is most effective for light scratches, swirl marks, and oxidation. Deep scratches that you can easily feel with your fingernail are usually too severe for hand buffing to completely remove. You might be able to lessen their appearance, but a professional paint correction service using machine polishers might be necessary for significant scratch repair.
Q3: What’s the difference between polishing and waxing?
Polishing is a corrective process that uses mild abrasives to remove imperfections like swirl marks and light scratches, revealing a smoother, more reflective surface. Waxing or sealing is a protective process that adds a layer of sacrificial protection to the paint, enhancing gloss and shielding it from the elements. You polish first, then wax.
Q4: Can I use a household polishing compound on my car?
No. Household polishing compounds are often too aggressive and contain ingredients not suited for automotive paint. Always use products specifically designed for car care and automotive paint.
Q5: How much pressure should I use when hand buffing?
Apply consistent, moderate pressure. Think of it as a firm, determined rub, not an aggressive scrub. The pressure should be enough to allow the polish’s abrasives to work without digging into the paint. Experiment on a small, inconspicuous area first if you’re unsure.
Q6: What is the best type of applicator pad for hand buffing?
Foam applicator pads are very popular and effective for hand buffing as they provide a good balance of conformity to the paint surface and effectiveness for the polishing compound. High-quality microfiber applicator pads are also an excellent choice, offering a softer touch and excellent product distribution.
Q7: Is it better to polish in circles or straight lines by hand?
While machine polishing often uses controlled circular motions or straight lines, when hand buffing, a combination of straight-line and overlapping strokes, or a gentle criss-cross pattern, is often recommended. This helps ensure even coverage and can aid in swirl removal more effectively without inducing new circular marks, which are a common outcome of amateur machine polishing with incorrect technique.
Hand buffing your car is a deeply satisfying process that can transform its appearance. By following these detailed steps, using the right products, and employing careful hand polishing techniques, you can achieve a stunning showroom finish that you’ll be proud of. Remember, patience and meticulousness are your greatest allies in this endeavor.