
Image Source: cdn.shopify.com
How to Compound and Polish a Car: Master Your Paint
Can you compound and polish a car at home? Yes, you absolutely can compound and polish a car at home with the right tools, products, and a bit of patience. This guide will walk you through the entire process, from understanding what compounding and polishing do to achieving a showroom-quality finish.
Achieving a truly flawless paint finish on your car isn’t just about washing and waxing. It’s about paint correction, a multi-step process that involves removing imperfections and restoring shine. At the heart of this lies car detailing, a meticulous approach to cleaning and protecting your vehicle. Two of the most crucial steps in paint correction are compounding and polishing. These techniques work together to erase minor to moderate paint defects, bringing back the depth and gloss your car’s paint once had.
This comprehensive guide will delve deep into how to compound and polish a car, equipping you with the knowledge and techniques to tackle everything from light scratches to stubborn swirl marks. We’ll cover everything you need to know, from selecting the right products to mastering the application.
The Purpose of Compounding and Polishing
Before we dive into the “how,” let’s clarify the “why.” Both compounding and polishing are abrasive processes designed to level the paint surface. Think of your car’s paint like a microscopic landscape. Over time, it gets marred by environmental factors, improper washing techniques, and everyday wear and tear. This creates a rough, uneven surface that scatters light, making the paint look dull, hazy, and covered in visible defects.
Compounding is the more aggressive of the two. Its primary goal is car scratch removal and the elimination of deeper imperfections. Automotive compounds contain larger abrasive particles that cut into the clear coat, effectively leveling down the high spots around a scratch or imperfection, making it disappear from view.
Polishing, on the other hand, is a finer, less aggressive process. It uses smaller abrasive particles to refine the surface after compounding and to remove lighter defects like swirl mark removal, water spots, and minor oxidation. Polishing further enhances gloss and depth, creating a smooth, reflective surface.
Together, compounding and polishing work in tandem to achieve a level of car surface restoration that simply washing and waxing cannot replicate. It’s about truly bringing your car’s paint back to life.
Essential Tools and Products for the Job
To successfully compound and polish your car, you’ll need a specific set of tools and products. Investing in quality items will make the process more effective and enjoyable.
1. Washing and Preparation Supplies:
- Two Buckets with Grit Guards: One for soapy water, one for rinsing your wash mitt. Grit guards prevent dirt from returning to the paint.
- pH-Neutral Car Wash Soap: To effectively clean the surface without stripping existing protection or damaging the paint.
- Wash Mitts (Microfiber or Lambswool): Gentle on paint and excellent at lifting dirt.
- Drying Towels (High-Quality Microfiber): Plush and absorbent to dry the car without scratching.
- Wheel Cleaner and Brushes: To clean wheels thoroughly before paint correction.
- All-Purpose Cleaner (APC) or Bug/Tar Remover: For stubborn contaminants.
2. Compounding and Polishing Tools:
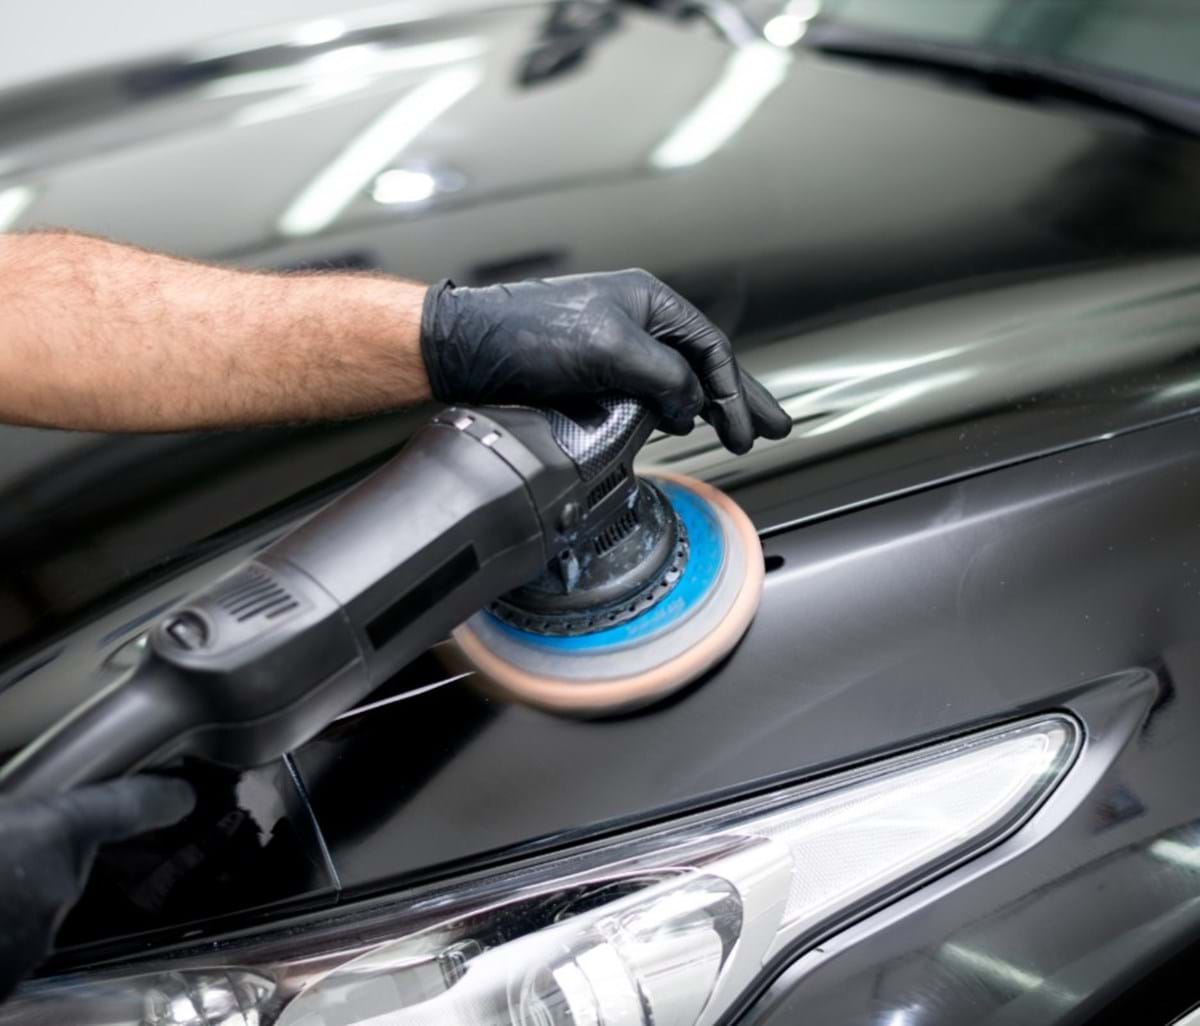
- Dual Action (DA) Polisher: Highly recommended for beginners and professionals alike. DA polishers oscillate and rotate, making them safer and easier to use than rotary polishers, reducing the risk of burning through paint.
- Polishing Pads: These come in various densities and materials.
- Cutting Pads (Wool or Aggressive Foam): Used with compounds for heavier defect removal.
- Polishing Pads (Medium Foam): Used with polishes for refining the finish.
- Finishing Pads (Softer Foam): Used with finishing polishes or glazes for maximum gloss.
- Automotive Compounds:
- Heavy Cut Compound: For deep scratches and heavy oxidation.
- Medium Cut Compound: For moderate scratches and swirl marks.
- Finishing Polish: For light haze and swirl removal, and to refine the surface after compounding.
- Microfiber Towels (Multiple): Crucial for wiping away residue after each step. Use clean towels for each process.
- Isopropyl Alcohol (IPA) Solution (Diluted 50/50 with Distilled Water): For paint decontamination and to remove polishing oils, revealing true clarity and any remaining defects.
- Masking Tape (Automotive Grade): To protect trim, rubber seals, and other delicate areas from the abrasive compounds and polishes.
3. Protection and Finishing Supplies:
- Car Wax or Sealant: To protect the newly corrected paint and enhance its gloss.
- Applicator Pads (Foam or Microfiber): For applying wax or sealant.
- Buffing Towels (Soft Microfiber): For buffing off wax or sealant.
The Step-by-Step Guide to Compounding and Polishing
This section details the critical steps involved in buffing car surfaces to perfection.
Step 1: Thorough Washing and Decontamination
The foundation of any successful paint correction is a pristine surface. Any dirt or debris left on the paint during the compounding and polishing stages can cause new scratches.
- Wash the Vehicle: Follow the two-bucket method meticulously. Start from the top of the car and work your way down. Rinse the wash mitt frequently in the rinse bucket.
- Clean Wheels and Tires: Use dedicated wheel cleaner and brushes.
- Rinse Thoroughly: Ensure all soap residue is removed.
- Dry the Vehicle: Use high-quality microfiber drying towels. Avoid air drying, as this can leave water spots.
- Decontaminate the Paint:
- Clay Bar Treatment: Use a clay bar with a clay lubricant to remove embedded contaminants like industrial fallout, rail dust, and brake dust. Glide the clay bar gently over the surface; if it feels gritty, it’s picking up contaminants. Wipe away residue with a clean microfiber towel. This is a vital step for smooth paint.
- Iron Remover (Optional but Recommended): For heavily contaminated vehicles, an iron remover can chemically break down ferrous particles embedded in the paint. Follow product instructions carefully.
- Tar and Bug Remover: Address any stubborn tar spots or bug residue.
Step 2: Inspect and Masking
Once the car is clean and decontaminated, it’s time for a thorough inspection and protective masking.
- Inspect the Paint: In good lighting (preferably direct sunlight or under a bright LED work light), examine the paint surface for scratches, swirl marks, oxidation, and other defects. The IPA wipe-down can help reveal these imperfections more clearly.
- Mask Off Trim and Delicate Areas: Use automotive-grade masking tape to protect black plastic trim, rubber seals, emblems, and any other areas you don’t want the polisher to touch. Compounds and polishes can stain or damage these materials. This step is crucial for a professional finish.
Step 3: Compounding – The Heavy Lifting
Compounding is where you tackle the more significant paint defects.
- Choose Your Compound and Pad: Select a compound and a corresponding cutting pad based on the severity of the defects. A wool pad with a heavy cut compound is for very deep scratches, while a foam cutting pad with a medium cut compound is suitable for most swirl marks and moderate scratches.
- Apply Compound to the Pad: Apply 3-4 pea-sized drops of compound directly onto the polishing pad.
- Priming the Pad: For foam pads, it’s good practice to lightly mist the pad with a detail spray or IPA solution before applying the compound. This helps the compound spread evenly and prevents it from drying out too quickly.
- Work in Small Sections: Divide the car into manageable sections, typically about 2×2 feet. This ensures you work the product effectively before it dries.
- Start with a Low Speed: Begin with the polisher on its lowest speed setting to spread the compound evenly across the section.
- Increase Speed: Gradually increase the speed to the recommended setting for your compound and pad (usually medium to high, around 3-4 on a DA polisher).
- Apply Moderate Pressure: Apply consistent, moderate pressure to the polisher. Let the machine do the work; don’t force it.
- Cross-Hatch Pattern: Move the polisher in a slow, steady motion, overlapping your passes by about 50%. Use a cross-hatch pattern (horizontal passes followed by vertical passes) to ensure complete coverage.
- Keep the Pad Flat: Ensure the pad remains flat against the surface to avoid creating new holograms or edges.
- Wipe Away Residue: After 2-4 passes (depending on the paint and product), lift the polisher and wipe away the compound residue with a clean microfiber towel.
- Inspect and Repeat: Inspect the section. If the defects are significantly reduced or gone, move to the next section. If not, you may need another pass or a more aggressive compound/pad combination. Be cautious not to overwork the paint.
- Clean Your Pad: Frequently clean your polishing pad using a brush or compressed air to remove excess compound and paint residue. A dirty pad will not cut effectively and can cause marring.
Step 4: Polishing – Refining the Finish
After compounding, the paint will look much better, but it may still have a slight haze or micro-marring from the more aggressive compounding step. Polishing refines this surface.
- Switch to a Polishing Pad and Polish: Use a less aggressive foam polishing pad and a dedicated finishing polish. This is essential for achieving a high level of gloss and clarity.
- Apply Polish to the Pad: Apply 2-3 pea-sized drops of polish to the pad.
- Repeat the Process: Work in small sections, using the same low-to-medium speed, cross-hatch pattern, and moderate pressure as during compounding. Polishing typically requires more passes than compounding.
- Focus on Clarity and Gloss: The goal here is to remove any remaining light imperfections and to bring out the deep gloss of the paint. You’ll notice the paint becoming much smoother and more reflective.
- Wipe Away Residue: Use a clean microfiber towel to wipe away polish residue after each section.
- IPA Wipe-Down: After completing a section with the polishing step, perform an IPA wipe-down. This removes all polishing oils and reveals the true clarity of the paint. Inspect closely for any remaining defects. If you see any, you might need another pass of polish or to re-evaluate your compounding step.
Step 5: Final Inspection and Protection
You’re almost there! The final steps ensure your hard work is protected and the finish looks spectacular.
- Final Wipe Down: Use a clean microfiber towel to give the entire car a final wipe-down to remove any lingering dust or fingerprints.
- Apply Protection (Car Wax or Sealant): This is crucial to protect the corrected paint and maintain its shine.
- Car Wax: Offers a warm, deep glow and natural oils.
- Sealants: Provide longer-lasting durability and a slick, glassy finish.
- Application: Apply your chosen wax or sealant evenly using an applicator pad. Work in small sections, applying a thin, even coat.
- Buffing Off: Allow the wax or sealant to haze over according to the manufacturer’s instructions. Then, gently buff it off with a clean, soft microfiber buffing towel. Flip the towel often to ensure you’re always buffing with a clean surface.
Tips for Mastering Car Polishing Techniques
- Work in the Shade: Direct sunlight can dry compounds and polishes too quickly, making them difficult to remove and potentially causing streaking or marring.
- Start with the Least Aggressive Method: Always begin with the least aggressive compound and pad combination that will effectively remove the defects. You can always step up if needed, but it’s hard to undo aggressive paint removal.
- Keep Your Pads Clean: This is paramount. A dirty pad is ineffective and damaging.
- Don’t Over-Polish: While tempting to keep going, over-polishing can thin the clear coat excessively, compromising its long-term integrity.
- Practice Makes Perfect: If you’re new to using a polisher, practice on a scrap panel or an older vehicle before tackling your prized possession.
- Listen to Your Polisher: A polisher that’s bogging down might indicate too much pressure or a pad that’s clogged.
- Consider Your Paint Type: Different car manufacturers use different paint formulations. Some paints are harder, while others are softer. You may need to adjust your approach.
Common Paint Defects and How to Address Them
Swirl Marks
These are circular scratches in the clear coat, typically caused by improper washing and drying techniques. They scatter light, making the paint look dull and hazy. Polishing with a medium polish and a foam polishing pad is usually sufficient for swirl mark removal.
Light Scratches
Scratches that are only in the clear coat, not down to the primer or base coat, can often be removed or significantly minimized through compounding and polishing. For deeper scratches, car scratch removal might require more aggressive compounding or even professional repainting if the scratch penetrates the clear coat.
Oxidation
This appears as a chalky, dulling of the paint, especially on older vehicles or those left exposed to the elements. It’s the breakdown of the clear coat. Compounding is typically needed to remove the oxidized layer and restore the paint’s color and shine.
Water Spots
These can etch into the clear coat if not removed promptly. While some can be buffed out with a light polish, heavier etching may require compounding.
When to Seek Professional Help
While this guide covers the essentials of how to compound and polish a car, there are situations where professional paint correction is advisable:
- Deep Scratches: If a scratch is deep enough to catch your fingernail and you can see primer or metal, it likely requires professional attention and possibly repainting.
- Clear Coat Failure: If the clear coat is peeling, flaking, or has extensive oxidation that doesn’t respond to compounding, the clear coat may have failed and needs professional refinishing.
- Extensive Damage: If your car has suffered significant damage from hail, vandalism, or a major accident, a professional detailer or body shop is your best bet.
- Lack of Confidence: If you’re not comfortable using a polisher or working on your car’s paint, it’s better to invest in professional services to avoid causing further damage.
Conclusion: The Reward of a Restored Finish
Mastering the art of compounding and polishing your car is a rewarding experience. It’s not just about making your car look good; it’s about preserving its value and protecting your investment. By following these detailed steps, using the right products, and practicing patience, you can transform your car’s paint from dull and damaged to a shining testament to meticulous car detailing. The process of car surface restoration through compounding and polishing is a cornerstone of achieving that coveted showroom shine, enhancing your vehicle’s aesthetic appeal and your pride of ownership.
Frequently Asked Questions (FAQ)
Q1: How often should I compound and polish my car?
A: It depends on your car’s exposure to the elements and your washing habits. For most daily drivers, compounding every 1-2 years is sufficient. Polishing can be done more frequently, perhaps every 6-12 months, to maintain the finish. Over-compounding can thin the clear coat, so it’s not a process to do too often.
Q2: Can I use a rotary polisher instead of a DA polisher?
A: Rotary polishers are more aggressive and can remove defects faster, but they require more skill and can easily burn through paint or create holograms if used incorrectly. For beginners and most enthusiasts, a Dual Action (DA) polisher is much safer and easier to master for effective car polishing techniques.
Q3: What’s the difference between a compound and a polish?
A: Compounds are more aggressive and contain larger abrasive particles to remove deeper scratches and defects. Polishes are finer and contain smaller abrasive particles to refine the surface after compounding, remove lighter swirls, and enhance gloss.
Q4: Do I need to wax my car after polishing?
A: Yes, it is highly recommended. Polishing removes all prior protection, and the newly corrected paint is exposed. Applying a car wax or sealant protects the paint from environmental contaminants and UV rays, and it maintains the gloss and depth achieved through polishing.
Q5: Can I compound and polish by hand?
A: While you can perform some light polishing by hand using a quality polish and a microfiber applicator, compounding to remove significant scratches and swirls is extremely difficult and time-consuming to do effectively by hand. A machine polisher is highly recommended for achieving professional results, especially for car scratch removal.