
Yes, you can absolutely polish a car by hand, and it’s a rewarding process for DIY car polishing enthusiasts. This guide will walk you through how to polish a car by hand as a beginner, covering everything from the essential supplies to the techniques for achieving a brilliant finish.
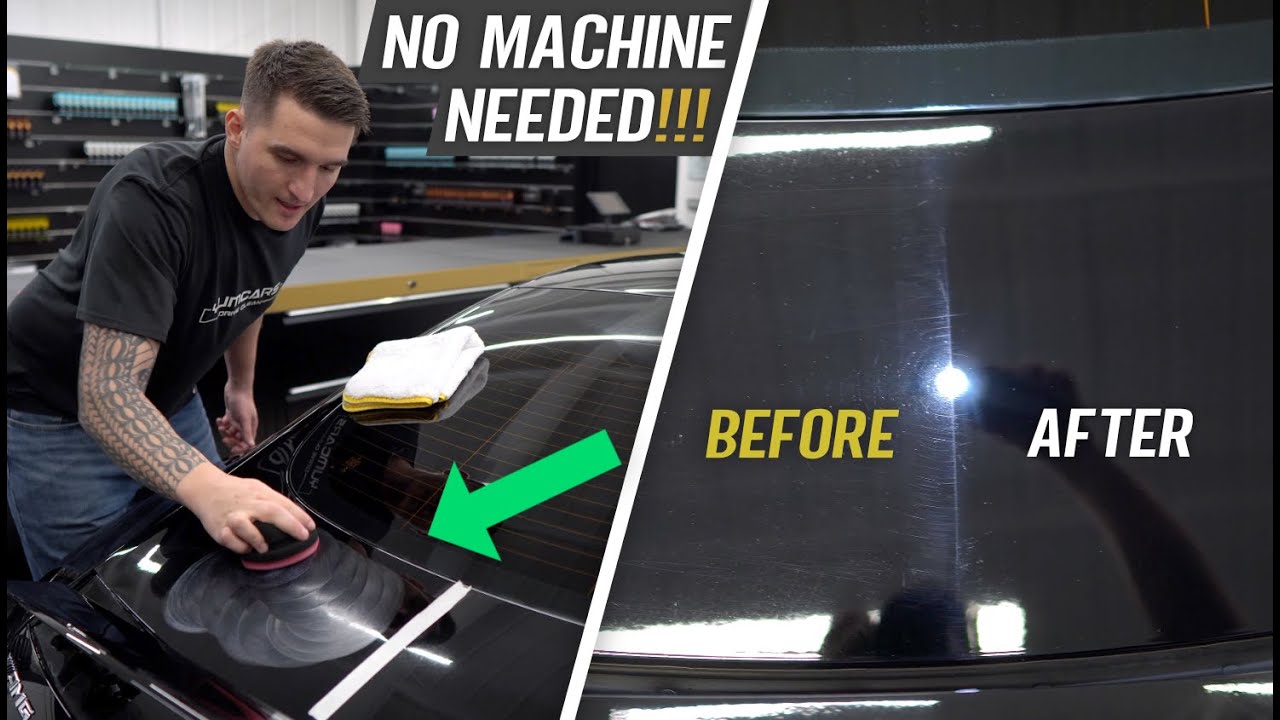
Image Source: i.ytimg.com
Can You Polish A Car By Hand? A Beginner’s Guide
Is it possible to achieve a showroom shine on your car’s paintwork without a high-speed polisher? The answer is a resounding yes! Hand polishing a car might sound labor-intensive, but with the right approach and a bit of elbow grease, you can effectively correct imperfections and bring out the depth and clarity of your car’s paint. This guide is designed for beginners looking to dive into manual car polishing and discover the satisfaction of DIY car polishing. We’ll explore the benefits, the necessary tools, and the step-by-step process for polishing car without a buffer, ensuring you can confidently tackle your first beginner car polishing project.
Why Choose Hand Polishing?
While machine polishers offer speed and efficiency, there are several compelling reasons why you might opt for car polishing by hand. It’s a fantastic entry point into paint correction, allowing you to develop a feel for the process and build confidence.
- Cost-Effective: Machines can be expensive. Hand polishing requires a much smaller initial investment in tools and products.
- Control and Precision: With your hands, you have incredible control over the pressure and the area you’re working on. This is crucial for beginners to avoid damaging the paint.
- Accessibility: You don’t need special training or a significant amount of space to hand polish. A clean garage or even a shaded outdoor spot will suffice.
- Satisfying Process: There’s a unique sense of accomplishment that comes from seeing the results of your own physical effort.
Deciphering Paint Defects: What Hand Polishing Can Fix
Before you start, it’s important to know what kinds of paint imperfections hand polishing car paint can effectively address.
- Light Swirl Marks: These fine, circular scratches often appear when washing or drying the car. Hand polishing can significantly reduce their visibility.
- Minor Scratches: Very shallow scratches that haven’t gone through the clear coat can often be improved or removed.
- Oxidation: Dull, faded paint, especially on older cars, can be revived with polishing.
- Water Spots: Mineral deposits left behind after water has dried can be polished away.
- Hazing: A cloudy or hazy appearance on the paint surface.
It’s important to note that deep scratches, gouges, or paint chips that expose the primer or metal are beyond the scope of hand polishing and would require professional repair.
Gathering Your Supplies: The Essential Toolkit for Hand Polishing
For effective hand polishing a car, you need the right products. Don’t skimp on quality, as this will directly impact your results.
Essential Products
- Car Wash Soap and Mitt: A pH-neutral car wash soap is crucial for safely cleaning the surface without stripping existing protection. A soft wash mitt (like microfiber or lambswool) will prevent introducing new scratches.
- Clay Bar or Clay Mitt: This is vital for removing bonded contaminants like tar, bug splatter, and industrial fallout that washing alone cannot remove. Using a lubricant is essential during this process.
- Rubbing Alcohol (IPA) or Panel Wipe: A diluted solution of isopropyl alcohol (50/50 with distilled water) or a dedicated panel wipe is used to strip away any wax, sealant, or polish residue, allowing you to see the true condition of the paint and ensure the new polish adheres properly.
- Car Polish: This is the abrasive compound that does the heavy lifting. Polishes come in different levels of cut (aggressiveness). For beginners and manual car polishing, starting with a fine-cut or finishing polish is recommended. You might consider a one-step polish that cleans and polishes simultaneously.
- Applicator Pads: You’ll need soft foam or microfiber applicator pads for applying the polish. Have a few on hand, as they can become saturated with product and removed paint.
- Microfiber Towels: High-quality, plush microfiber towels are essential for buffing off the polish residue. You’ll need many of them. Look for towels with a high GSM (grams per square meter) for maximum absorbency and softness.
- Gloves and Eye Protection: Always protect your skin and eyes, especially when working with chemicals.
Optional but Recommended Items
- Car Wax or Sealant: After polishing, you’ll want to protect the newly revealed finish with a layer of wax or a paint sealant.
- Lighting: Good lighting is crucial for spotting imperfections and ensuring you’re working evenly. A strong LED work light or even a powerful flashlight can be very helpful.
- Spray Bottle: For your clay lubricant and IPA solution.
The Step-by-Step Process: Your Guide to Hand Polishing Car Paint
Now that you have your supplies, let’s break down how to polish a car by hand effectively. Patience and thoroughness are key.
Step 1: Thorough Washing
- Prep the Area: Ensure the car is parked in a shaded area and the surface is cool to the touch. Direct sunlight can cause products to dry too quickly and make buffing difficult.
- Two-Bucket Method: Use two buckets – one with soapy water and one with clean rinse water. Dip your wash mitt into the soapy water, wash a section of the car, then rinse the mitt thoroughly in the clean water before dipping it back into the soapy water. This prevents dirt from being transferred back onto the paint, which can cause scratches.
- Wash Top to Bottom: Start with the roof and work your way down, saving the dirtiest areas like the lower panels and wheels for last.
- Rinse Thoroughly: Rinse the entire car with a strong stream of water, allowing the water to sheet off the paint. This helps in drying and removes most of the loose dirt.
Step 2: Drying and Decontamination
- Gentle Drying: Use clean, plush microfiber drying towels. Blot the water rather than wiping aggressively. Work from top to bottom.
- Clay Bar Application:
- Lubrication is Key: Spray a generous amount of clay lubricant onto a small section of the paint.
- Glide the Clay: Take a small piece of clay bar (or use your clay mitt) and gently glide it over the lubricated surface. You’ll feel it catching on contaminants. Keep gliding until the surface feels smooth and slick.
- Knead the Clay: As the clay picks up dirt, fold it over on itself (knead it) to expose a clean surface.
- Wipe and Inspect: Wipe away any excess lubricant with a clean microfiber towel. Inspect the clay; if it’s heavily soiled, you’ll know how much contamination was on your paint.
- Work in Sections: Complete this process for the entire car, working in manageable sections.
Step 3: Polish Application and Removal
This is where the magic of hand polishing car exterior happens.
- Work in Small Sections: Do not try to polish the entire car at once. Divide the car into small, manageable sections, roughly 2ft x 2ft.
- Apply the Polish: Place a small amount of polish (about a dime-sized amount) onto your foam or microfiber applicator pad.
- The Polishing Motion:
- Apply to Paint: Gently place the applicator pad onto the paint surface.
- Cross-Hatching Technique: Begin applying the polish using moderate pressure in a back-and-forth motion, overlapping each pass by about 50%. Then, go over the same section in a side-to-side motion, again overlapping by 50%. This cross-hatching pattern ensures even coverage and correction.
- Maintain Even Pressure: Apply consistent, moderate pressure. You’re not trying to scrub the paint off, but rather to allow the polish’s abrasives to work.
- Work the Polish: Continue working the polish until it begins to look clear or slightly hazy. This indicates the abrasives have broken down. For effective hand polishing, aim for 5-10 passes per section, depending on the product and the level of correction needed.
- Buff Off Residue:
- Use a Clean Microfiber Towel: Take a clean, plush microfiber towel and gently wipe away the polish residue.
- Flip and Fold: Use a clean side of the towel with each wipe. As the towel becomes saturated, fold it to expose a fresh surface.
- Inspect Your Work: Turn your headlamp on or look under good lighting to inspect the section. You should see a noticeable improvement in clarity and a reduction in imperfections.
Step 4: Repeat and Refine
- Move to the Next Section: Once a section is polished and buffed, move on to the next, slightly overlapping the previously polished area.
- Address Stubborn Areas: If some imperfections remain after the initial pass, you can reapply polish to that specific area and work it in again. Be patient; polishing car without a buffer requires persistence.
Step 5: Final Wipe Down and Protection
- IPA Wipe Down: After polishing the entire car, wipe down each section with your diluted IPA or panel wipe solution. This removes any residual polish oils, allowing you to see the true finish and ensuring your sealant or wax will bond properly.
- Apply Protection: Apply a coat of high-quality car wax or paint sealant. This will protect the newly polished paint, enhance gloss, and make future washing easier. Follow the product manufacturer’s instructions for application and removal.
Tips for Successful Beginner Car Polishing
To make your beginner car polishing experience as smooth and successful as possible, keep these tips in mind:
- Start Small: If you’re nervous, begin with a single panel, like the hood or a fender, to get a feel for the process.
- Test Spot: Before tackling the whole car, do a test spot on an inconspicuous area to gauge how the polish performs and how much pressure is needed.
- Don’t Rush: This is not a race. Take your time, be methodical, and enjoy the process.
- Cleanliness is Paramount: Ensure all your tools, especially your microfiber towels, are impeccably clean. Any grit or dirt can cause new scratches.
- Listen to Your Paint: Pay attention to how the polish is working. If it’s dusting excessively or leaving marring, adjust your pressure or product.
- Manage Your Mitts: If you’re using applicator mitts, keep them clean and separate. If a mitt drops on the floor, wash it before using it again.
- Inspect Your Towels: After buffing, inspect your microfiber towels. If they feel gritty, they’ve done their job and should be set aside for washing.
What If It Doesn’t Look Perfect?
It’s rare for a first-time hand polishing a car attempt to yield flawless results. That’s perfectly normal!
- Deeper Scratches: If some scratches persist, they might be too deep for a mild polish or hand application. You may need a more aggressive polish or consider professional help.
- Uneven Results: If you notice patchy areas, it’s likely due to uneven pressure or not working the polish long enough. You can go back over those areas.
- Marring: Sometimes, even with careful hand polishing, you might introduce very light marring. A finer finishing polish and a clean applicator pad can often resolve this.
The goal for a beginner is significant improvement, not necessarily perfection. With practice, your technique will refine, and your results will become even more impressive.
Caring for Your Polished Finish
After you’ve invested time and effort into polishing car without a buffer, maintaining that shine is important.
- Regular Washing: Continue to wash your car regularly using the two-bucket method and quality car wash products.
- Drying: Use clean microfiber drying towels.
- Protection: Reapply wax or sealant every few months, or as recommended by the product manufacturer, to keep the paint protected and glossy.
- Avoid Automatic Car Washes: The brushes in automatic car washes are notorious for inflicting swirl marks, undoing all your hard work.
Comprehending the Polish: Cut vs. Finish
When choosing a polish for hand polishing car paint, you’ll encounter terms like “cutting” and “finishing.”
| Polish Type | Abrasiveness | Purpose | Best For |
|---|---|---|---|
| Cutting Polish | High | Removes deeper scratches, heavy oxidation, and defects | Experienced users or for significant paint correction tasks. |
| Polishing Compound | Medium | A balance of correction and refinement | General paint correction for moderate imperfections. |
| Finishing Polish | Low | Removes light haze, micro-marring, and leaves a high gloss | Refining the paint after using a cutting polish, or for light correction. |
For beginners engaged in DIY car polishing, starting with a finishing polish or a one-step polish is highly recommended. These are more forgiving and less likely to cause damage if applied incorrectly.
Frequently Asked Questions (FAQ)
Q1: How long does it take to polish a car by hand?
A: It can take anywhere from 4 to 10 hours, depending on the size of the car, the condition of the paint, and your experience level.
Q2: Can I use household cleaners for polishing?
A: No, it’s crucial to use products specifically designed for automotive paint. Household cleaners can be too harsh and damage the clear coat.
Q3: How often should I polish my car?
A: For most vehicles, polishing once or twice a year is sufficient, especially if you maintain it well. Over-polishing can thin the clear coat.
Q4: What’s the difference between polishing and waxing?
A: Polishing removes microscopic layers of paint to eliminate defects and restore clarity. Waxing is a protective layer applied on top of the paint to add shine and shield it from the elements.
Q5: Can I polish a brand new car?
A: Yes, even new cars can benefit from polishing to remove minor imperfections from manufacturing and transport. However, you’ll likely only need a finishing polish.
Q6: My polish is drying too fast. What should I do?
A: Ensure you are working in a shaded area and that the surface is cool. You might also be using too much product, or the humidity is very low. Mist the panel lightly with distilled water if needed, but avoid excessive amounts.
Q7: What if I accidentally polish through the paint?
A: This is a serious concern with polishing. If you see a different color or a matte-looking spot, you have likely gone through the clear coat. Stop immediately. This defect requires professional repair. This is why starting with lighter polishes and practicing on a test spot is so important for beginner car polishing.
Q8: How do I know if I’m applying enough pressure for effective hand polishing?
A: You want to apply enough pressure to feel the polish working, similar to rubbing lotion into your skin. Too little pressure won’t remove defects, and too much can cause marring. It’s a feel you’ll develop with practice.
Q9: Should I polish the entire car or just specific panels?
A: For the best overall look, you should polish the entire car. If you only polish one panel, the difference in shine might be noticeable. However, if you’re just starting out or only have time for one section, focus on the most visible areas like the hood or doors.
Q10: Can I use an old t-shirt to buff off polish?
A: While tempting, old t-shirts are often made of materials that are too abrasive for car paint and can easily cause new scratches. Always opt for clean, high-quality microfiber towels for the best and safest results when hand polishing car exterior.
Conclusion
Can you polish a car by hand? Absolutely. It’s a viable and rewarding method for any car enthusiast looking to improve their vehicle’s appearance. By gathering the right supplies, following a systematic approach, and exercising patience, you can achieve impressive results with manual car polishing. This journey into DIY car polishing will not only enhance your car’s aesthetics but also deepen your appreciation for its care and maintenance. Embrace the process, learn as you go, and enjoy the satisfaction of a beautifully polished car that you brought back to life with your own hands. Happy polishing!