
Image Source: i.ytimg.com
Can Red and Yellow Wires Go Together on Car Stereo?
No, red and yellow wires should generally not be directly connected together when installing a car stereo. While both carry 12V DC voltage, they serve distinct and crucial functions in powering your aftermarket stereo and maintaining memory settings. Mismatching them can lead to damage, blown fuses, and improper operation.
Deciphering Car Stereo Wiring: A Crucial Step for Audio Installation
Embarking on a car stereo installation, whether you’re upgrading to a sleek aftermarket stereo or simply replacing a faulty unit, often brings up a common question for DIY enthusiasts: “Can red and yellow wires go together on a car stereo?” It’s a question rooted in the visual similarity of these wires carrying power, but the answer is a definitive no, and here’s why. This guide will delve deep into car stereo wiring, explaining the roles of these vital cables, and helping you navigate your audio installation with confidence.
The Fundamental Roles of Red and Yellow Wires
In the world of car audio installation, wires aren’t just colorful strands; they are arteries carrying electrical signals that bring your music to life. The red and yellow wires are particularly important as they deal with power delivery and memory retention. Let’s break down their primary functions:
-
The Yellow Wire: Constant Power (Battery)
The yellow wire is your car stereo’s lifeline, providing a constant 12V DC voltage directly from the car’s battery. This means it receives power all the time, even when the ignition key is turned off. Its primary role is to power the stereo’s internal clock and memory functions. This allows your aftermarket stereo to remember your favorite radio stations, equalizer settings, and other personalized preferences so you don’t have to re-enter them every time you start your car. Think of it as the stereo’s persistent memory. -
The Red Wire: Switched Power (Accessory)
The red wire, on the other hand, is connected to the car’s ignition switch. It receives 12V DC voltage only when the ignition key is in the “accessory” or “on” position. This means the stereo will only turn on and operate when the car’s ignition is on. When you turn off the car, the red wire loses power, and in turn, the stereo powers down. This prevents the stereo from draining the car battery when it’s not in use.
Why Mixing Them is a Recipe for Disaster
Connecting the red and yellow wires directly bypasses the intended power management system of your stereo. Here’s what can happen:
- Constant Battery Drain: If you connect the red wire (switched power) directly to the yellow wire (constant power), your stereo will essentially be permanently “on” from the battery’s perspective. Even when the car is off, the stereo will continue to draw power, leading to a dead car battery over time. This is a common cause of unexpected battery drain.
- Loss of Memory Settings: Conversely, if you connect the yellow wire (constant power) to the red wire (switched power), your stereo will lose its memory every time you turn off the ignition. You’ll have to reset your radio stations and other settings each time you start your car, which is incredibly inconvenient.
- Damage to the Stereo Unit: The internal components of your stereo are designed to receive power in a specific sequence and manner. Incorrect wiring, especially with power sources, can overload or damage sensitive electronics within the stereo unit itself, potentially rendering it irreparable.
- Blown Fuses: Most car stereos have an internal fuse to protect them from power surges and wiring errors. Mismatching the red and yellow wires can trigger this fuse, causing it to blow. While a blown fuse is a protective measure, repeatedly blowing fuses indicates a fundamental wiring problem that needs to be addressed.
Fathoming the Wiring Harness: The Bridge Between Stereo and Car
To correctly connect your aftermarket stereo, you’ll likely encounter a wiring harness. This is a crucial component in the car stereo wiring process. It acts as an adapter, allowing you to connect your new stereo’s wiring to your car’s existing electrical system without having to cut or splice into the factory wires.
The Importance of the Wiring Harness
- Plug-and-Play Simplicity: A good wiring harness will have color-coded connectors that are designed to match both your aftermarket stereo and your vehicle’s specific harness. This makes the audio installation process significantly easier and safer.
- Preserving Factory Wiring: By using a harness, you avoid damaging the original wiring in your car, which is important if you ever plan to sell the vehicle or revert to the original stereo.
- Correct Wire Matching: The harness is designed to correctly interpret and direct the power and signal wires from your car to your new stereo. It ensures that the constant power goes to the memory circuits and the switched power goes to the operating circuits.
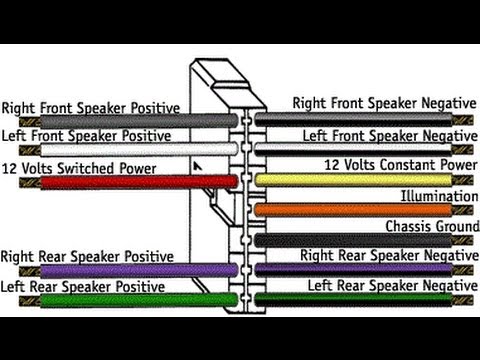
Matching Colors: A Universal Language (Mostly)
While there’s a general convention for speaker wire colors and power wires, it’s essential to consult the documentation for both your specific car and your new stereo.
Common Wire Color Conventions:
| Wire Color | Function | Notes |
|---|---|---|
| Yellow | Constant Power (Battery) | Powers memory and clock functions. |
| Red | Switched Power (Accessory/Ignition) | Powers the stereo when the ignition is on. |
| Blue | Power Antenna / Amplifier Turn-On | Activates power antennas or external amplifiers when the stereo is on. |
| Black | Ground | Connects to the vehicle’s chassis for a solid ground connection. |
| Orange | Illumination / Dimmer | Dims the stereo display when headlights are on. |
| White | Left Front Speaker (+) | Positive terminal for the left front speaker. |
| White/Black | Left Front Speaker (-) | Negative terminal for the left front speaker. |
| Gray | Right Front Speaker (+) | Positive terminal for the right front speaker. |
| Gray/Black | Right Front Speaker (-) | Negative terminal for the right front speaker. |
| Green | Left Rear Speaker (+) | Positive terminal for the left rear speaker. |
| Green/Black | Left Rear Speaker (-) | Negative terminal for the left rear speaker. |
| Purple | Right Rear Speaker (+) | Positive terminal for the right rear speaker. |
| Purple/Black | Right Rear Speaker (-) | Negative terminal for the right rear speaker. |
Important Note: These are common colors, but variations exist. Always refer to the wiring diagrams provided with your car stereo and vehicle.
Ensuring Positive Negative Connection: A Foundation for Sound
Beyond power wires, proper positive negative connection for your speakers is vital for good sound quality. Connecting speakers with reversed polarity (positive to negative and vice-versa) can lead to:
- Phase Cancellation: When speakers are out of phase, the sound waves they produce will partially cancel each other out. This results in thin, weak bass and a muddy, unclear midrange.
- Reduced Sound Quality: Overall, the audio will sound less powerful and less defined.
Identifying Speaker Polarity
Speaker wires typically have a stripe or a ridge on one of the conductors to indicate the positive terminal. When connecting to your stereo or amplifier, ensure that the wire with the stripe or ridge on your speaker connects to the positive terminal on the stereo’s wiring harness, and the solid color wire connects to the negative terminal.
Amplifier Wiring Considerations
If your audio installation involves an external amplifier wiring, the same principles of correct polarity and secure connections apply. Amplifiers often require a direct connection to the battery (usually a thicker red wire, often with an inline fuse) for their main power source, and a thinner remote turn-on wire (often blue) to signal when to power up. Always consult the amplifier’s manual for specific amplifier wiring instructions.
Troubleshooting Common Car Stereo Issues
Even with careful installation, you might encounter issues. Here’s some basic car audio troubleshooting:
Common Problems and Solutions:
-
No Power:
- Check the stereo’s fuse.
- Verify the yellow (constant power) and red (switched power) wires are correctly connected to your car’s wiring harness via the adapter.
- Ensure the ground wire (black) is securely connected to a clean, unpainted metal surface on the car’s chassis.
- Test the wires with a multimeter to confirm they are receiving 12V DC when expected.
-
Stereo Powers On but No Sound:
- Check all speaker wire connections, ensuring correct positive negative connection and that no wires are shorting.
- Verify the speaker wire colors are matched correctly at both the stereo and speaker ends.
- If using an amplifier, ensure it’s receiving power and the remote turn-on signal.
- Check the stereo’s internal settings; some have mute functions or specific output selections.
-
Stereo Loses Memory Settings:
- This almost always indicates an issue with the yellow (constant power) wire. Ensure it is securely connected to a source of constant 12V DC.
- Check the wiring harness and the connection to your car’s factory harness for any loose wires.
- Test the yellow wire with a multimeter to ensure it has power even when the car is off.
-
Fuses Keep Blowing:
- This is a strong indicator of a short circuit. Carefully inspect all wiring, especially where wires might be pinched, frayed, or touching unintended metal surfaces.
- Double-check that the red and yellow wires are not accidentally connected.
- Ensure the stereo’s current draw does not exceed the rating of the fuse.
Frequently Asked Questions About Car Stereo Wiring
Q1: Can I connect the red and yellow wires directly if my car doesn’t have a separate accessory wire?
A1: It’s highly unlikely that a modern car will lack a suitable accessory wire. If you’re unsure, consult a professional or your car’s service manual. Improperly connecting these wires can damage your stereo.
Q2: What if my aftermarket stereo has different colored wires than the standard ones?
A2: Always refer to the installation manual that came with your specific aftermarket stereo. It will detail the function of each wire.
Q3: How do I test wires with a multimeter to check for power?
A3: Set your multimeter to measure DC voltage (VDC). Touch the red probe to the wire you want to test and the black probe to a known good ground (like a bare metal part of the car’s chassis). The multimeter will display the voltage.
Q4: Is it safe to splice wires if I don’t have a wiring harness?
A4: While possible, splicing factory wires is not recommended. It can void warranties, lead to unreliable connections, and makes troubleshooting much harder. Using a dedicated wiring harness is the safest and most professional approach.
Q5: What is the difference between constant power and switched power?
A5: Constant power is always available from the battery, regardless of the ignition status. Switched power is only active when the ignition is in the “on” or “accessory” position.
By taking the time to decipher car stereo wiring and ensuring each wire is connected to its proper function, you can achieve a professional-quality audio installation that brings your music to life. Remember, accuracy and care in car stereo wiring prevent potential damage and ensure your aftermarket stereo performs at its best.